


You are looking at the documentation of a prior release. To read the documentation of the latest release, please
visit here.
New to Stash? Please start here.
Using Stash with Azure Kubernetes Service (AKS)
This tutorial will show you how to use Stash to backup and restore a volume in Azure Kubernetes Service. Here, we are going to backup the /source/data folder of a busybox pod into Azure Blob Storage. Then, we are going to show how to recover this data into a PersistentVolumeClaim(PVC). We are going to also re-deploy deployment using this recovered volume.
Before You Begin
At first, you need to have a AKS cluster. If you don’t already have a cluster, create one from here.
Install Stash in your cluster following the steps here.
You should be familiar with the following Stash concepts:
You will need a Azure Blob Storage to store the backup snapshots.
To keep things isolated, we are going to use a separate namespace called demo throughout this tutorial.
$ kubectl create ns demo
namespace/demo created
Note: YAML files used in this tutorial are stored in /docs/examples/platforms/aks directory of stashed/docs repository.
Backup
In order to take backup, we need some sample data. Stash has some sample data in stash-data repository. As gitRepo volume has been deprecated, we are not going to use this repository as volume directly. Instead, we are going to create a configMap from the stash-data repository and use that ConfigMap as data source.
Let’s create a ConfigMap from these sample data,
$ kubectl create configmap -n demo stash-sample-data \
	--from-literal=LICENSE="$(curl -fsSL https://github.com/stashed/stash-data/raw/master/LICENSE)" \
	--from-literal=README.md="$(curl -fsSL https://github.com/stashed/stash-data/raw/master/README.md)"
configmap/stash-sample-data created
Deploy Workload:
Now, deploy the following Deployment. Here, we have mounted the ConfigMap stash-sample-data as data source volume.
Below, the YAML for the Deployment we are going to create.
apiVersion: apps/v1
kind: Deployment
metadata:
  labels:
    app: stash-demo
  name: stash-demo
  namespace: demo
spec:
  replicas: 1
  selector:
    matchLabels:
      app: stash-demo
  template:
    metadata:
      labels:
        app: stash-demo
      name: busybox
    spec:
      containers:
      - args:
        - sleep
        - "3600"
        image: busybox
        imagePullPolicy: IfNotPresent
        name: busybox
        volumeMounts:
        - mountPath: /source/data
          name: source-data
      restartPolicy: Always
      volumes:
      - name: source-data
        configMap:
          name: stash-sample-data
Let’s create the deployment we have shown above,
$ kubectl apply -f https://github.com/stashed/docs/raw/v2020.08.27/docs/examples/platforms/aks/deployment.yaml
deployment.apps/stash-demo created
Now, wait for deployment’s pod to go in Running state.
$ kubectl get pod -n demo -l app=stash-demo
NAME                          READY   STATUS    RESTARTS   AGE
stash-demo-7584fd7748-nl5n8   1/1     Running   0          3m
You can check that the /source/data/ directory of this pod is populated with data from the stash-sample-data ConfigMap using this command,
$ kubectl exec -n demo stash-demo-7584fd7748-nl5n8 -- ls -R /source/data
/source/data:
LICENSE
README.md
Now, we are ready to backup /source/data directory into Azure Blob Container.
Create Secret:
At first, we need to create a storage secret that hold the credentials for the backend. To configure this backend, the following secret keys are needed:
| Key | Description |
|---|---|
RESTIC_PASSWORD | Required. Password used to encrypt snapshots by restic |
AZURE_ACCOUNT_NAME | Required. Azure Storage account name |
AZURE_ACCOUNT_KEY | Required. Azure Storage account key |
Create the storage secret as below,
$ echo -n 'changeit' >RESTIC_PASSWORD
$ echo -n '<your-azure-storage-account-name>' > AZURE_ACCOUNT_NAME
$ echo -n '<your-azure-storage-account-key>' > AZURE_ACCOUNT_KEY
$ kubectl create secret generic -n demo azure-secret \
    --from-file=./RESTIC_PASSWORD \
    --from-file=./AZURE_ACCOUNT_NAME \
    --from-file=./AZURE_ACCOUNT_KEY
secret/azure-secret created
Verify that the secret has been created successfully,
$ kubectl get secret -n demo azure-secret -o yaml
apiVersion: v1
data:
  AZURE_ACCOUNT_KEY: <base64 encoded AZURE_ACCOUNT_KEY>
  AZURE_ACCOUNT_NAME: <base64 encoded AZURE_ACCOUNT_NAME>
  RESTIC_PASSWORD: Y2hhbmdlaXQ=
kind: Secret
metadata:
  creationTimestamp: 2018-11-12T07:09:36Z
  name: azure-secret
  namespace: demo
  resourceVersion: "15708"
  selfLink: /api/v1/namespaces/demo/secrets/azure-secret
  uid: ea0b4275-e649-11e8-b68c-a62bf720de95
type: Opaque
Create Restic:
Now, we are going to create Restic crd to take backup /source/data directory of stash-demo deployment. This will create a repository in the Azure blob container specified in azure.container field and start taking periodic backup of /source/data directory.
$ kubectl apply -f https://github.com/stashed/docs/raw/v2020.08.27/docs/examples/platforms/aks/restic.yaml
restic.stash.appscode.com/azure-restic created
Below, the YAML for Restic crd we have created above,
apiVersion: stash.appscode.com/v1alpha1
kind: Restic
metadata:
  name: azure-restic
  namespace: demo
spec:
  selector:
    matchLabels:
      app: stash-demo
  fileGroups:
  - path: /source/data
    retentionPolicyName: 'keep-last-5'
  backend:
    azure:
      container: stashqa
      prefix: demo
    storageSecretName: azure-secret
  schedule: '@every 1m'
  volumeMounts:
  - mountPath: /source/data
    name: source-data
  retentionPolicies:
  - name: 'keep-last-5'
    keepLast: 5
    prune: true
If everything goes well, Stash will inject a sidecar container into the stash-demo deployment to take periodic backup. Let’s check sidecar has been injected successfully,
$ kubectl get pod -n demo -l app=stash-demo
NAME                          READY   STATUS    RESTARTS   AGE
stash-demo-6b8c94cdd7-8jhtn   2/2     Running   1          1h
Look at the pod. It now has 2 containers. If you view the resource definition of this pod, you will see there is a container named stash which running backup command.
Verify Backup:
Stash will create a Repository crd with name deployment.stash-demo for the respective repository in Azure backend at first backup schedule. To verify, run the following command,
$ kubectl get repository deployment.stash-demo -n demo
NAME                    BACKUPCOUNT   LASTSUCCESSFULBACKUP   AGE
deployment.stash-demo   8             13s                    8m
Here, BACKUPCOUNT field indicates number of backup snapshot has taken in this repository.
Restic will take backup of the volume periodically with a 1-minute interval. You can verify that backup snapshots are created successfully by,
$ kubectl get snapshots -n demo -l repository=deployment.stash-demo
NAME                             AGE
deployment.stash-demo-52ee5eaa   4m36s
deployment.stash-demo-9a3c5d10   3m36s
deployment.stash-demo-39df477a   2m36s
deployment.stash-demo-e315dfb4   96s
deployment.stash-demo-59633ea3   36s
Here, we can see 5 last successful backup Snapshot taken by Stash in deployment.stash-demo repository.
If you navigate to <bucket name>/demo/deployment/stash-demo directory in your Azure storage bucket. You will see, a repository has been created there.
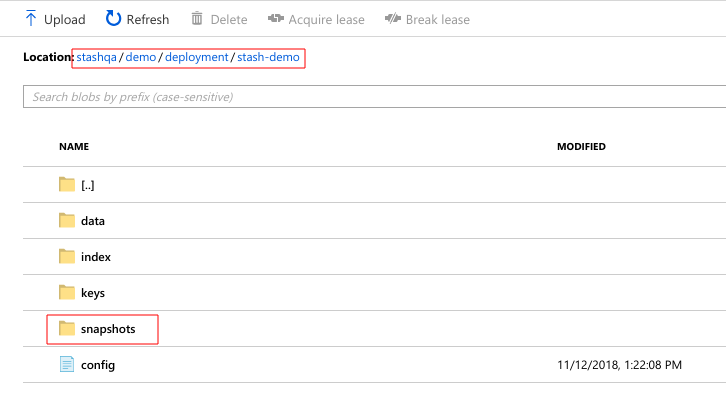
To view the snapshot files, navigate to snapshots directory of the repository,
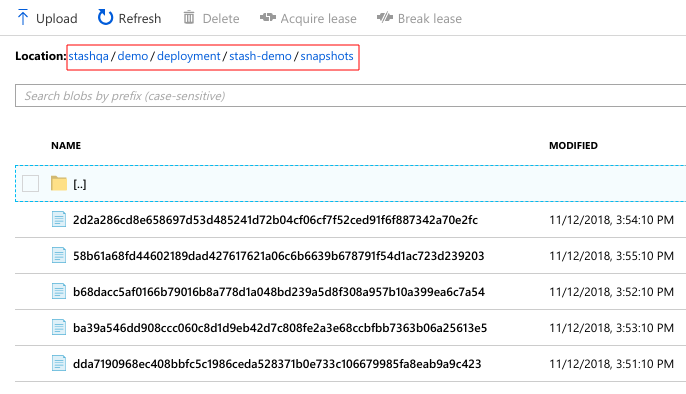
Stash keeps all backup data encrypted. So, snapshot files in the bucket will not contain any meaningful data until they are decrypted.
Recovery
Now, consider that we have lost our workload as well as data volume. We want to recover the data into a new volume and re-deploy the workload.
At first, let’s delete Restic crd, stash-demo deployment and stash-sample-data ConfigMap.
$ kubectl delete deployment -n demo stash-demo
deployment.extensions "stash-demo" deleted

$ kubectl delete restic -n demo azure-restic
restic.stash.appscode.com "azure-restic" deleted

$ kubectl delete configmap -n demo stash-sample-data
configmap "stash-sample-data" deleted
In order to perform recovery, we need Repository crd deployment.stah-demo and backend secret azure-secret to exist.
In case of cluster disaster, you might lose
Repositorycrd and backend secret. In this scenario, you have to create the secret again andRepositorycrd manually. Follow the guide to understandRepositorycrd structure from here.
Create PVC:
Let’s create a PersistentVolumeClaim where our recovered data will be stored.
$ kubectl apply -f https://github.com/stashed/docs/raw/v2020.08.27/docs/examples/platforms/aks/pvc.yaml
persistentvolumeclaim/stash-recovered created
Below the YAML for PersistentVolumeClaim we have created above,
apiVersion: v1
kind: PersistentVolumeClaim
metadata:
  name: stash-recovered
  namespace: demo
  labels:
    app: stash-demo
spec:
  storageClassName: default
  accessModes:
  - ReadWriteOnce
  resources:
    requests:
      storage: 50Mi
Check that if cluster has provisioned the requested claim,
$ kubectl get pvc -n demo -l app=stash-demo
NAME              STATUS   VOLUME                                     CAPACITY   ACCESS MODES   STORAGECLASS   AGE
stash-recovered   Bound    pvc-f6bddbf6-e66a-11e8-b68c-a62bf720de95   1Gi        RWO            default        1m
Look at the STATUS filed. stash-recovered PVC is bounded to volume pvc-f6bddbf6-e66a-11e8-b68c-a62bf720de95.
Create Recovery:
Now, we have to create a Recovery crd to recover backed up data into this PVC.
$ kubectl apply -f https://github.com/stashed/docs/raw/v2020.08.27/docs/examples/platforms/aks/recovery.yaml
recovery.stash.appscode.com/azure-recovery created
Below, the YAML for Recovery crd we have created above.
apiVersion: stash.appscode.com/v1alpha1
kind: Recovery
metadata:
  name: azure-recovery
  namespace: demo
spec:
  repository:
    name: deployment.stash-demo
    namespace: demo
  paths:
  - /source/data
  recoveredVolumes:
  - mountPath: /source/data
    persistentVolumeClaim:
      claimName: stash-recovered
Wait until Recovery job completes its task. To verify that recovery has completed successfully run,
$ kubectl get recovery -n demo azure-recovery
NAME             REPOSITORYNAMESPACE   REPOSITORYNAME          SNAPSHOT   PHASE       AGE
azure-recovery   demo                  deployment.stash-demo              Succeeded   3m
Here, PHASE Succeeded indicate that our recovery has been completed successfully. Backup data has been restored in stash-recovered PVC. Now, we are ready to use this PVC to re-deploy workload.
If you are using Kubernetes version older than v1.11.0 then run following command and check status.phase field to see whether the recovery succeeded or failed.
$ kubectl get recovery -n demo azure-recovery -o yaml
Re-deploy Workload:
We have successfully restored backup data into stash-recovered PVC. Now, we are going to re-deploy our previous deployment stash-demo. This time, we are going to mount the stash-recovered PVC as source-data volume instead of ConfigMap stash-sample-data.
Below, the YAML for stash-demo deployment with stash-recovered PVC as source-data volume.
apiVersion: apps/v1
kind: Deployment
metadata:
  labels:
    app: stash-demo
  name: stash-demo
  namespace: demo
spec:
  replicas: 1
  selector:
    matchLabels:
      app: stash-demo
  template:
    metadata:
      labels:
        app: stash-demo
      name: busybox
    spec:
      containers:
      - args:
        - sleep
        - "3600"
        image: busybox
        imagePullPolicy: IfNotPresent
        name: busybox
        volumeMounts:
        - mountPath: /source/data
          name: source-data
      restartPolicy: Always
      volumes:
      - name: source-data
        persistentVolumeClaim:
          claimName: stash-recovered
Let’s create the deployment,
$  kubectl apply -f https://github.com/stashed/docs/raw/v2020.08.27/docs/examples/platforms/aks/recovered-deployment.yaml
deployment.apps/stash-demo created
Verify Recovered Data:
We have re-deployed stash-demo deployment with recovered volume. Now, it is time to verify that the data are present in /source/data directory.
Get the pod of new deployment,
$ kubectl get pod -n demo -l app=stash-demo
NAME                          READY   STATUS    RESTARTS   AGE
stash-demo-69994758c9-v7ntg   1/1     Running   0          3m
Run following command to view data of /source/data directory of this pod,
$ kubectl exec -n demo stash-demo-69994758c9-v7ntg -- ls -R /source/data
/source/data:
LICENSE
README.md
lost+found

/source/data/lost+found:
So, we can see that the data we had backed up from original deployment are now present in re-deployed deployment.
Cleanup
To cleanup the resources created by this tutorial, run following commands:
$ kubectl delete recovery -n demo azure-recovery
$ kubectl delete secret -n demo azure-secret
$ kubectl delete deployment -n demo stash-demo
$ kubectl delete pvc -n demo stash-recovered
$ kubectl delete repository -n demo deployment.stash-demo
$ kubectl delete ns demo
- To uninstall Stash from your cluster, follow the instructions from here.