


You are looking at the documentation of a prior release. To read the documentation of the latest release, please
visit here.
Backup & Restore a WordPress Site Using Batch Backup
This tutorial will demonstrate how to use Stash to take backup of an application with multiple co-related components. Here, we are going to take backup of a WordPress Site.
Before You Begin
At first, you need to have a Kubernetes cluster, and the
kubectlcommand-line tool must be configured to communicate with your cluster. If you do not already have a cluster, you can create one by using kind.Install
Stashin your cluster following the steps here.Install MySQL addon for Stash following the steps here.
If you are not familiar with how Stash backup and restore MySQL databases, please check the following guide here.
You should be familiar with the following
Stashconcepts:
To keep everything isolated, we are going to use a separate namespace called demo throughout this tutorial.
$ kubectl create ns demo
namespace/demo created
Note: YAML files used in this tutorial are stored in docs/examples/guides/latest/batch-backup directory of stashed/docs repository.
Deploy WordPress Site
At first, we are going to deploy a WordPress site with a MySQL database and generate some sample data in it. Then, we are going to backup this site’s data and database into a GCS bucket. Finally, we are going to show how we can restore the site form the backed up data.
Deploy Database
We are going to use MySQL as the database for our WordPress site. So, let’s deploy the database first.
Let’s create a secret for the MySQL database,
$ kubectl create secret  -n demo generic mysql-pass \
  --from-literal=username=root                      \
  --from-literal=password=mysqlpass
secret/mysql-pass created
Now, let’s create a MySQL deployment with this secret. Below are the YAML of the MySQL Deployment along with its Service and PVC,
apiVersion: v1
kind: Service
metadata:
  name: wordpress-db
  namespace: demo
  labels:
    app: wordpress-db
spec:
  ports:
  - port: 3306
  selector:
    app: wordpress-db
---
apiVersion: apps/v1
kind: Deployment
metadata:
  name: wordpress-db
  namespace: demo
  labels:
    app: wordpress-db
spec:
  selector:
    matchLabels:
      app: wordpress-db
  strategy:
    type: Recreate
  template:
    metadata:
      labels:
        app: wordpress-db
    spec:
      containers:
      - image: mysql:8.0.14
        name: mysql
        args:
        - --default-authentication-plugin=mysql_native_password
        env:
        - name: MYSQL_ROOT_PASSWORD
          valueFrom:
            secretKeyRef:
              name: mysql-pass
              key: password
        - name: MYSQL_USER
          valueFrom:
            secretKeyRef:
              name: mysql-pass
              key: username
        ports:
        - containerPort: 3306
          name: mysql
        volumeMounts:
        - name: storage
          mountPath: /var/lib/mysql
        - name: config-volume
          mountPath: /etc/mysql/conf.d
      volumes:
      - name: storage
        persistentVolumeClaim:
          claimName: mysql-pvc
      - name: config-volume
        emptyDir: {}
---
apiVersion: v1
kind: PersistentVolumeClaim
metadata:
  name: mysql-pvc
  namespace: demo
  labels:
    app: wordpress-db
spec:
  accessModes:
  - ReadWriteOnce
  resources:
    requests:
      storage: 1Gi
Let’s create the above MySQL Deployment,
$ kubectl apply -f https://github.com/stashed/docs/raw/v2021.01.21/docs/examples/guides/latest/batch-backup/mysql.yaml
service/wordpress-db created
deployment.apps/wordpress-db created
persistentvolumeclaim/mysql-pvc created
Now, wait for the MySQL pod to go into running state,
$ kubectl get pod -n demo -l app=wordpress-db
NAME                            READY   STATUS    RESTARTS   AGE
wordpress-db-58657b89b9-kgt76   1/1     Running   0          104s
Let’s check if the MySQL database is ready to accept connections,
$ kubectl logs -n demo -f wordpress-db-58657b89b9-kgt76
Initializing database
....
....
2020-01-07T12:33:23.242350Z 0 [System] [MY-010931] [Server] /usr/sbin/mysqld: ready for connections. Version: '8.0.14'  socket: '/var/run/mysqld/mysqld.sock'  port: 3306  MySQL Community Server - GPL.
2020-01-07T12:33:23.325316Z 0 [System] [MY-011323] [Server] X Plugin ready for connections. Bind-address: '::' port: 33060
From the last line, we can see the database is ready to accept connections.
Deploy WordPress
Now, we are going to deploy our WordPress app in another Deployment. This going to use the MySQL database through the wordpress-db Service that we have created earlier.
Below is the YAML of the WordPress Deployment along with its PVC and Service:
apiVersion: v1
kind: Service
metadata:
  name: wordpress-app
  namespace: demo
  labels:
    app: wordpress-app
spec:
  ports:
  - port: 80
  selector:
    app: wordpress-app
---
apiVersion: apps/v1
kind: Deployment
metadata:
  name: wordpress-app
  namespace: demo
  labels:
    app: wordpress-app
spec:
  selector:
    matchLabels:
      app: wordpress-app
  strategy:
    type: Recreate
  template:
    metadata:
      labels:
        app: wordpress-app
    spec:
      containers:
      - image: wordpress:5.3.2-apache
        name: wordpress
        env:
        - name: WORDPRESS_DB_HOST
          value: wordpress-db
        - name: WORDPRESS_DB_PASSWORD
          valueFrom:
            secretKeyRef:
              name: mysql-pass
              key: password
        - name: WORDPRESS_DB_USER
          valueFrom:
            secretKeyRef:
              name: mysql-pass
              key: username
        ports:
        - containerPort: 80
          name: wordpress
        volumeMounts:
        - name: storage
          mountPath: /var/www/html
      volumes:
      - name: storage
        persistentVolumeClaim:
          claimName: wordpress-pvc
---
apiVersion: v1
kind: PersistentVolumeClaim
metadata:
  name: wordpress-pvc
  namespace: demo
  labels:
    app: wordpress-app
spec:
  accessModes:
  - ReadWriteOnce
  resources:
    requests:
      storage: 1Gi
Let’s create the above Deployment,
$ kubectl apply -f https://github.com/stashed/docs/raw/v2021.01.21/docs/examples/guides/latest/batch-backup/wordpress.yaml
service/wordpress-app created
deployment.apps/wordpress-app created
persistentvolumeclaim/wordpress-pvc created
Now, wait for the wordpress pod to go into running state,
$ kubectl get pod -n demo -l app=wordpress-app
NAME                             READY   STATUS    RESTARTS   AGE
wordpress-app-59b69858f9-48phf   1/1     Running   0          3m40s
So, we can see that our WordPress site is running. Now, its time to insert some sample data.
Insert Sample Data
At first, lets port-forward the wordpress-app Service that we have created with the WordPress deployment.
$ kubectl port-forward -n demo service/wordpress-app 8080:80
Forwarding from 127.0.0.1:8080 -> 80
Forwarding from [::1]:8080 -> 80
Now, we can access our site through a browser at localhost:8080. Let’s complete the initial setup.

Once we have completed the setup, let’s create some sample blog posts. Here, I have created a sample post titled Stash Batch Backup Test.

When we save the post, WordPress will store it into the database. If we exec into the database pod, we will see the post has been stored there.
$ kubectl exec -it -n demo wordpress-db-58657b89b9-kgt76 -- mysql --user=root --password=mysqlpass
...
mysql> show databases;
+--------------------+
| Database           |
+--------------------+
| information_schema |
| mysql              |
| performance_schema |
| sys                |
| wordpress          |
+--------------------+
5 rows in set (0.01 sec)

mysql> show tables in wordpress;
+-----------------------+
| Tables_in_wordpress   |
+-----------------------+
| wp_commentmeta        |
| wp_comments           |
| wp_links              |
| wp_options            |
| wp_postmeta           |
| wp_posts              |
| wp_term_relationships |
| wp_term_taxonomy      |
| wp_termmeta           |
| wp_terms              |
| wp_usermeta           |
| wp_users              |
+-----------------------+
12 rows in set (0.00 sec)

mysql> use wordpress;
Reading table information for completion of table and column names
You can turn off this feature to get a quicker startup with -A

Database changed

mysql> select post_name from wp_posts;
+-------------------------+
| post_name               |
+-------------------------+
| hello-world             |
| sample-page             |
| privacy-policy          |
|                         |
| stash-batch-backup-test |
| 5-revision-v1           |
+-------------------------+
6 rows in set (0.00 sec)

mysql> exit
Bye
So, we can see that our post has been stored with stash-batch-backup-test name.
Also, WordPress pod write some files in its /var/www/html directory. Let’s see whats file has been written there:
$ kubectl exec -it -n demo wordpress-app-59b69858f9-48phf -- ls /var/www/html
index.php        wp-blog-header.php    wp-cron.php        wp-mail.php
license.txt      wp-comments-post.php  wp-includes        wp-settings.php
readme.html      wp-config-sample.php  wp-links-opml.php  wp-signup.php
wp-activate.php  wp-config.php         wp-load.php        wp-trackback.php
wp-admin         wp-content            wp-login.php       xmlrpc.php
Notice the wp-content directory. We will work with this directory later in this tutorial.
Now, our wordpress site is running and we have created some post into it. Now, its time to setup a backup for our site.
Backup
Here, we are going to backup the /var/www/html directory of the WordPress pod and the MySQL database into a GCS bucket using BackupBatch.
Create AppBinding
At first, let’s create an AppBinding CR that holds the connection information of the MySQL database. Stash uses this AppBinding to connect with the database.
Here, is the AppBinding CR holding connection information of our MySQL database,
apiVersion: appcatalog.appscode.com/v1alpha1
kind: AppBinding
metadata:
  name: wordpress-db
  namespace: demo
spec:
  type: mysql
  version: 8.0.14
  clientConfig:
    service:
      name: wordpress-db
      port: 3306
      scheme: mysql
  secret:
    name: mysql-pass
Here,
.spec.clientConfig.service.namespecifies the name of the Service that connects to the MySQL database..spec.clientConfig.service.portspecifies the port where the target database is running..spec.secretspecifies the name of the Secret that holds the necessary credentials to access the database.spec.typespecifies the types of the database it pointing to.
Let’s create the above AppBinding,
$ kubectl apply -f https://github.com/stashed/docs/raw/v2021.01.21/docs/examples/guides/latest/batch-backup/appbinding.yaml
appbinding.appcatalog.appscode.com/wordpress-db
Prepare Backend
We are going to store our backed up data into a GCS bucket. We have to create a Secret with the necessary credentials and a Repository CR to use this backend. If you want to use a different backend, please read the respective backend configuration doc from here.
For GCS backend, if the bucket does not exist, Stash needs
Storage Object Adminrole permissions to create the bucket. For more details, please check the following guide.
Create Secret:
Let’s create a Secret called gcs-secret with access credentials to our desired GCS bucket,
$ echo -n 'changeit' > RESTIC_PASSWORD
$ echo -n '<your-project-id>' > GOOGLE_PROJECT_ID
$ cat /path/to/downloaded-sa-json.key > GOOGLE_SERVICE_ACCOUNT_JSON_KEY
$ kubectl create secret generic -n demo gcs-secret \
    --from-file=./RESTIC_PASSWORD \
    --from-file=./GOOGLE_PROJECT_ID \
    --from-file=./GOOGLE_SERVICE_ACCOUNT_JSON_KEY
secret/gcs-secret created
Create Repository:
Now, let’s create a Repository with our GCS bucket information. Below is the YAML of Repository CR we are going to create,
apiVersion: stash.appscode.com/v1alpha1
kind: Repository
metadata:
  name: gcs-repo
  namespace: demo
spec:
  backend:
    gcs:
      bucket: stashed-ci
      prefix: /wordpress/backup
    storageSecretName: gcs-secret
Let’s create the Repository we have shown above,
$ kubectl apply -f https://github.com/stashed/docs/raw/v2021.01.21/docs/examples/guides/latest/batch-backup/repository.yaml
repository.stash.appscode.com/gcs-repo created
Now, we are ready to backup our WordPress site into this backend.
Backup
Now, we are going to create a BackupBatch CR targeting the MySQL database and the WordPress deployment.
Create BackupBatch:
Below is the YAML of the BackupBatch CR that we are going to create,
apiVersion: stash.appscode.com/v1beta1
kind: BackupBatch
metadata:
  name: wordpress-backup
  namespace: demo
spec:
  repository:
    name: gcs-repo
  schedule: "*/5 * * * *"
  executionOrder: Parallel
  members:
  - target:
      alias: db
      ref:
        apiVersion: appcatalog.appscode.com/v1alpha1
        kind: AppBinding
        name: wordpress-db
    task:
      name: mysql-backup-v2020.07.09-beta.0
  - target:
      alias: app
      ref:
        apiVersion: apps/v1
        kind: Deployment
        name: wordpress-app
      volumeMounts:
      - name: storage
        mountPath: /var/www/html
      paths:
      - /var/www/html
  retentionPolicy:
    name: 'keep-last-10'
    keepLast: 10
    prune: true
Here,
spec.repositoryrefers to theRepositorythat holds the information of our GCS backend.spec.scheduleis a cron expression that indicates that backup will take at every 5 minutes interval.spec.executionOrderspecifies that we want to take backup both of the components in parallel.spec.membersspecifies a list of targets that are subject to backup. In our case, we are going to specify theAppBindingof our MySQL database and the WordPress deployment as members. Each of the members may have the following sub-fields:target.aliasspecify the host identifier that will be used to separate data of this member in the backend.target.refrefers to the target that will be backed up.target.pathsspecifies a list of file paths to backup for the target.target.volumeMountsspecifies a list of volumes and their mountPath that contain the target paths.task.namerefers to theTaskobject that specifies theFunctionand their execution order to perform the backup in the Function-Task model.
Let’s create the BackupBatch crd we have shown above,
$ kubectl apply -f https://github.com/stashed/docs/raw/v2021.01.21/docs/examples/guides/latest/batch-backup/backupbatch.yaml
backupbatch.stash.appscode.com/wordpress-backup created
Verify CronJob:
Stash will also create a CronJob with the schedule specified in spec.schedule field of BackupBatch CR.
Verify that the CronJob has been created successfully,
$ kubectl get cronjob -n demo
NAME                            SCHEDULE      SUSPEND   ACTIVE   LAST SCHEDULE   AGE
stash-backup-wordpress-backup   */5 * * * *   False     0        <none>          32s
Wait for BackupSession:
The CronJob will trigger a backup on each scheduled slot by creating a BackupSession CR. Let’s wait for a BackupSession to complete,
$  kubectl get backupsession -n demo -w
NAME                          INVOKER-TYPE   INVOKER-NAME       PHASE       AGE
wordpress-backup-1597245602   BackupBatch    wordpress-backup               0s
wordpress-backup-1597245602   BackupBatch    wordpress-backup   Running     0s
wordpress-backup-1597245602   BackupBatch    wordpress-backup   Succeeded   40s
We can see from the above output that the BackupSession has Succeeded. It means Stash has backed up our database and the /var/www/html directory of the WordPress deployment successfully.
Verify Backup:
When a backup session is completed, Stash will update the respective Repository to reflect the latest state of backed up data.
Run the following command to check if a backup snapshot has been stored in the backend,
$ kubectl get repository -n demo gcs-repo
NAME       INTEGRITY   SIZE        SNAPSHOT-COUNT   LAST-SUCCESSFUL-BACKUP   AGE
gcs-repo   true        183.5Mi     2                3s                       38m
From the output above, we can see that 2 snapshots have been stored in the backend.
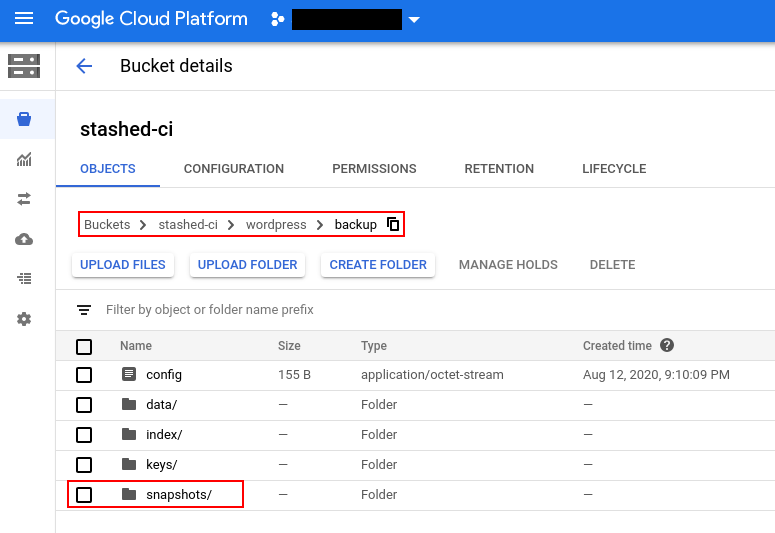
Now, if we navigate to our GCS bucket, we are going to see that the backed up data has been stored in /wordpress/backup directory as specified by the prefix field of the Repository.
Note: Stash keeps all the backed up data encrypted. So, data in the backend will not make any sense until they are decrypted.
Restore
In the previous section, we have successfully backed up the database and /var/www/html directory our WordPress deployment into a GCS bucket. Now, it is time to see the restore process in action.
Here, we are going to see two different restore scenarios:
Batch Restore: In this scenario, we will assume that both of the components (database and wordpress deployment) our WordPress site has been damaged. In this case, we will restore the backed up data of both components using a
RestoreBatchobject.Individual Restore: In this scenario, we will assume that only the database has been damaged. So, restoring only the database is sufficient. In this case, we are going to restore the database using a
RestoreSessionobject.
Pause Backup:
At first, let stop the backup so that no new backup happens during the restore process. Let’s set spec.paused section of BackupBatch to true which will stop taking further scheduled backup.
$ kubectl patch backupbatch -n demo wordpress-backup --type="merge" --patch='{"spec": {"paused": true}}'
backupbatch.stash.appscode.com/wordpress-backup patched
It should suspend the respective CronJob which is responsible for triggering backup at a scheduled slot. Let’s verify that the CronJob has been suspended.
$ kubectl get cronjob -n demo
NAME                            SCHEDULE      SUSPEND   ACTIVE   LAST SCHEDULE   AGE
stash-backup-wordpress-backup   */5 * * * *   True      0        12h             13h
Batch Restore
In this section, we are going to simulate a disaster scenario where we will damage both the database and the wordpress deployment’s data. Then, we will restore them from the backup.
Simulate Disaster:
At first, let’s corrupt the database. Here, we are going to delete the sample post we have created earlier.
$ kubectl exec -it -n demo wordpress-db-58657b89b9-kgt76 -- mysql --user=root --password=mysqlpass
....
mysql> show tables from wordpress;
+-----------------------+
| Tables_in_wordpress   |
+-----------------------+
| wp_commentmeta        |
| wp_comments           |
| wp_links              |
| wp_options            |
| wp_postmeta           |
| wp_posts              |
| wp_term_relationships |
| wp_term_taxonomy      |
| wp_termmeta           |
| wp_terms              |
| wp_usermeta           |
| wp_users              |
+-----------------------+
12 rows in set (0.01 sec)

mysql> use wordpress;
Reading table information for completion of table and column names
You can turn off this feature to get a quicker startup with -A

Database changed
mysql> show tables;
+-----------------------+
| Tables_in_wordpress   |
+-----------------------+
| wp_commentmeta        |
| wp_comments           |
| wp_links              |
| wp_options            |
| wp_postmeta           |
| wp_posts              |
| wp_term_relationships |
| wp_term_taxonomy      |
| wp_termmeta           |
| wp_terms              |
| wp_usermeta           |
| wp_users              |
+-----------------------+
12 rows in set (0.00 sec)

mysql> select post_name from wp_posts;
+-------------------------+
| post_name               |
+-------------------------+
| hello-world             |
| sample-page             |
| privacy-policy          |
|                         |
| stash-batch-backup-test |
| 5-revision-v1           |
+-------------------------+
6 rows in set (0.00 sec)

mysql> delete from wp_posts where post_name='stash-batch-backup-test';
Query OK, 1 row affected (0.01 sec)

mysql> select post_name from wp_posts;
+----------------+
| post_name      |
+----------------+
| hello-world    |
| sample-page    |
| privacy-policy |
|                |
| 5-revision-v1  |
+----------------+
5 rows in set (0.00 sec)

mysql> exit;
Bye
We have deleted the stash-batch-backup-test post from the database. Now, if you go to our WordPress site through a browser, you will see that the sample post that we had created is missing now.
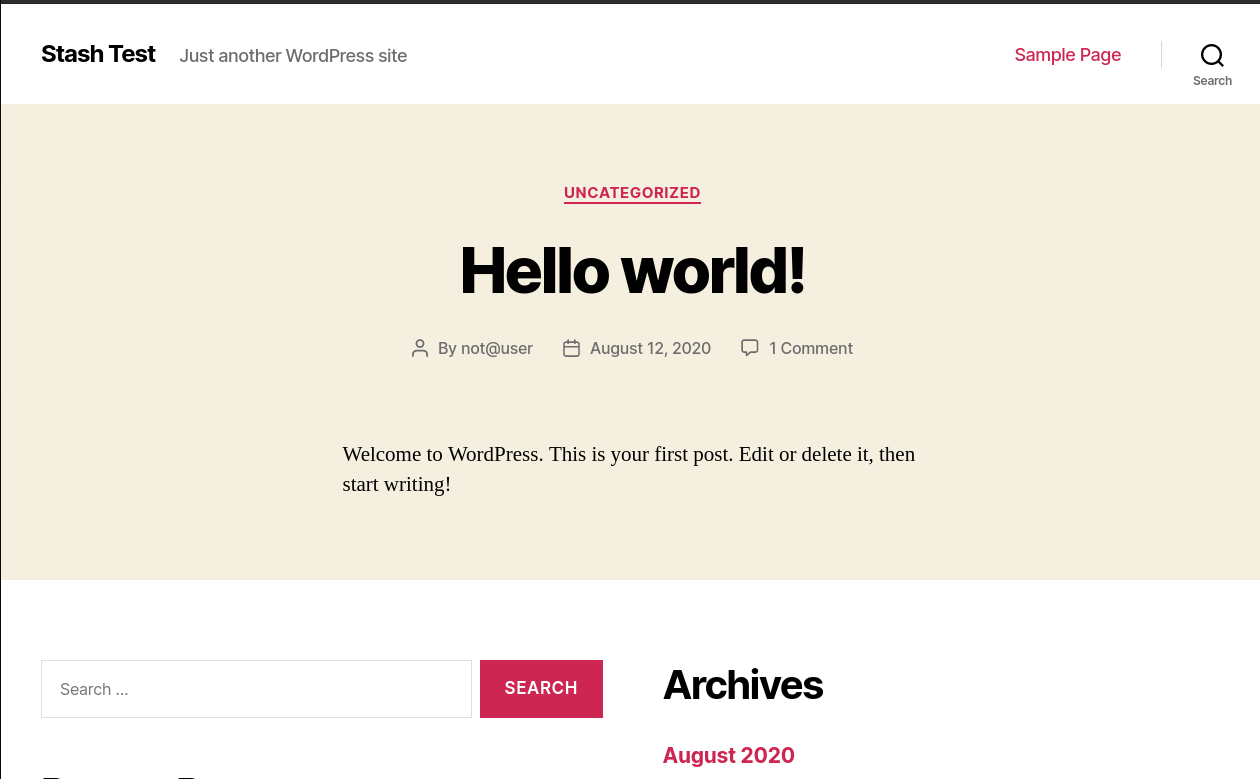
So, we can see that the sample post is gone. Only, the Hello World! post is now available.
Now, let’s do some damage to our WordPress deployment too. Here, we are going to remove the wp-content directory from /var/www/html directory of our WordPress pod.
$ kubectl exec -n demo wordpress-app-5b778b446-gtd6d -c wordpress -- rm -r /var/www/html/wp-content
Verify that the wp-content directory has been removed.
$ kubectl exec -n demo wordpress-app-5b778b446-gtd6d -c wordpress  -- ls /var/www/html
index.php
license.txt
readme.html
wp-activate.php
wp-admin
wp-blog-header.php
wp-comments-post.php
wp-config-sample.php
wp-config.php
wp-cron.php
wp-includes
wp-links-opml.php
wp-load.php
wp-login.php
wp-mail.php
wp-settings.php
wp-signup.php
wp-trackback.php
xmlrpc.php
So, we can see from the above that the wp-content directory is no longer present in /var/www/html directory.
Create RestoreBatch:
Now, we are going to restore both of the components using a RestoreBatch. Here, is the YAML of the RestoreBatch CR that we are going to use:
apiVersion: stash.appscode.com/v1beta1
kind: RestoreBatch
metadata:
  name: wordpress-restore
  namespace: demo
spec:
  driver: Restic
  repository:
    name: gcs-repo
  executionOrder: Sequential
  members:
  - target:
      alias: db
      ref:
        apiVersion: appcatalog.appscode.com/v1alpha1
        kind: AppBinding
        name: wordpress-db
      rules:
      - snapshots: [latest]
    task:
      name: mysql-restore-v2020.07.09-beta.0
  - target:
      alias: app
      ref:
        apiVersion: apps/v1
        kind: Deployment
        name: wordpress-app
      rules:
      - paths:
        - /var/www/html
      volumeMounts:
      - name: storage
        mountPath: /var/www/html
Here,
spec.repositoryspecifies that we are restoring from thegcs-repoRepository.spec.executionOrderspecify that we want Stash to restore the component sequentially. Here, we want to restore the database first then we want to restore the wordpress deployment’s data.spec.membersspecify the targets to be restored. Each member may have the following sub-fields.target.aliasspecify the host identifier of the backed up data for this member. It must be the same as thealiasused during backup.target.refrefers to the target to restore.target.rulesspecify the rules for restoring the data of this member. Here, we want to restore thelatestsnapshot for the database and the latest state of/var/www/htmlpath for our WordPress deployment.target.volumeMountsspecifies the volume mounts where the data will be restored.task.namerefers to theTaskobject to use to restore the member in the Function-Task model.
Let’s create the above RestoreBatch object,
$ kubectl apply -f https://github.com/stashed/docs/raw/v2021.01.21/docs/examples/guides/latest/batch-backup/restorebatch.yaml
restorebatch.stash.appscode.com/wordpress-restore created
Now, wait for the RestoreBatch phase to go into Succeeded state.
$ kubectl get restorebatch -n demo -w
NAME                REPOSITORY   PHASE     AGE
wordpress-restore   gcs-repo     Running   7s
wordpress-restore   gcs-repo     Succeeded   2m
We can see from above that Stash has successfully restored both components. Now, it’s time to verify whether data has been restored or not.
Verify Restored Data :
Let’s verify that sample-batch-backup-test post that we had deleted from the database has been restored.
$ kubectl exec -n demo wordpress-db-58657b89b9-kgt76 -- mysql --user=root --password=mysqlpass -e "SELECT post_name FROM wordpress.wp_posts;"
mysql: [Warning] Using a password on the command line interface can be insecure.
post_name
hello-world
sample-page
privacy-policy

stash-batch-backup-test
5-revision-v1=
We can see that the stash-batch-backup-test post is now present in the database.
Again, let verify whether the wp-content directory that we had removed from the WordPress deployment’s pod has been restored or not.
$ kubectl exec -n demo wordpress-app-684b577c89-wpsqs -c wordpress  -- ls /var/www/html
index.php
license.txt
readme.html
wp-activate.php
wp-admin
wp-blog-header.php
wp-comments-post.php
wp-config-sample.php
wp-config.php
wp-content
wp-cron.php
wp-includes
wp-links-opml.php
wp-load.php
wp-login.php
wp-mail.php
wp-settings.php
wp-signup.php
wp-trackback.php
xmlrpc.php
We can see from the above that the wp-content has been restored successfully.
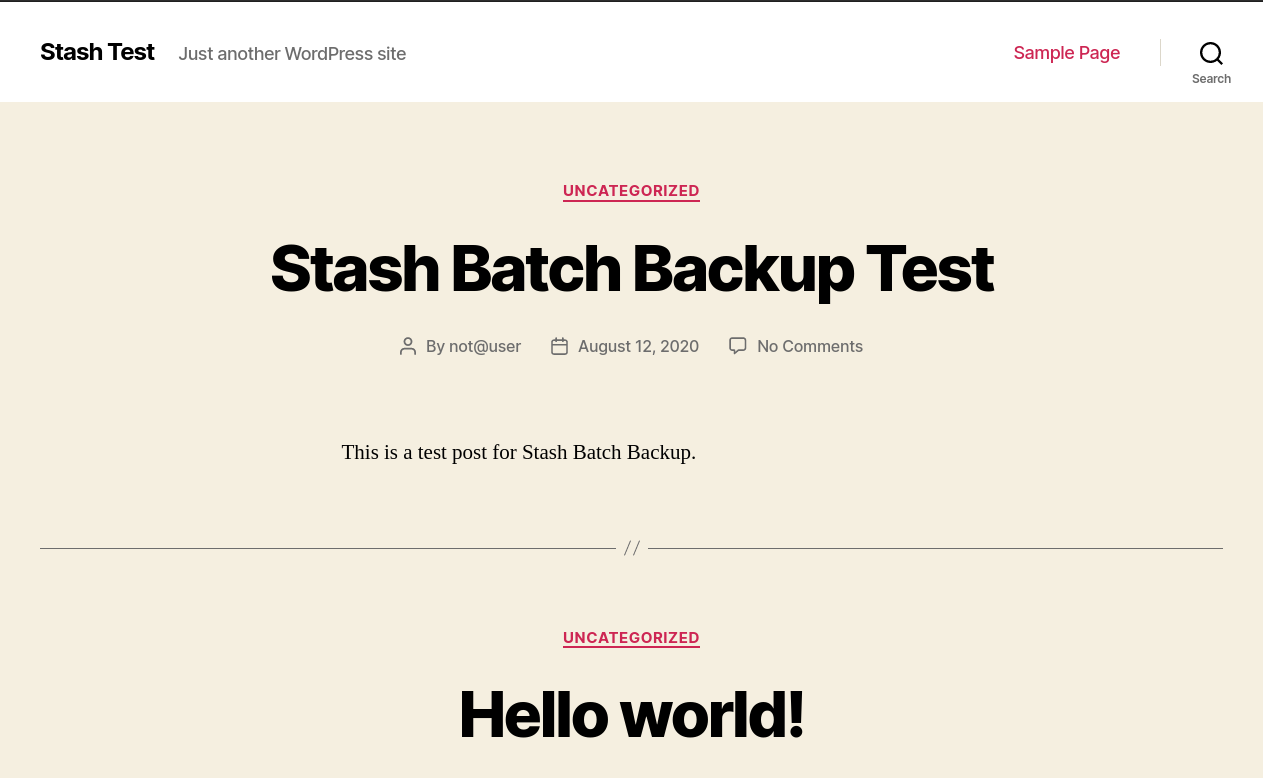
Now, if you go to the WordPress site through a browser, you will see that the Stash Batch Backup Test post is present now.
Individual Restore
In this section, we are going to simulate a disaster scenario where the data of only one component get damaged. So, restoring only the damaged component is sufficient.
Here, we are going to delete the sample post again from the database and then restore it using a RestoreSession.
Simulate Disaster Scenario :
Let’s delete the sample post from the database:
$ kubectl exec -n demo wordpress-db-58657b89b9-kgt76 -- mysql --user=root --password=mysqlpass -e "DELETE FROM wordpress.wp_posts WHERE post_name='stash-batch-backup-test';"
Verify that the sample post has been removed:
$ kubectl exec -n demo wordpress-db-58657b89b9-kgt76 -- mysql --user=root --password=mysqlpass -e "SELECT post_name FROM wordpress.wp_posts;"
mysql: [Warning] Using a password on the command line interface can be insecure.
post_name
hello-world
sample-page
privacy-policy

5-revision-v1
We can see from the above output that stash-batch-backup-test entry no longer presents in the database.
Create RestoreSession:
Now, let’s create a RestoreSession object targeting the AppBinding of our MySQL database. Here, is the YAML of the RestoreSession that we are going to create:
apiVersion: stash.appscode.com/v1beta1
kind: RestoreSession
metadata:
  name: wordpress-db-restore
  namespace: demo
spec:
  task:
    name: mysql-restore-v2020.07.09-beta.0
  repository:
    name: gcs-repo
  target:
    alias: db
    ref:
      apiVersion: appcatalog.appscode.com/v1alpha1
      kind: AppBinding
      name: wordpress-db
    rules:
    - snapshots: [latest]
Let’s create the above RestoreSession object,
$ kubectl apply -f https://github.com/stashed/docs/raw/v2021.01.21/docs/examples/guides/latest/batch-backup/restoresession.yaml
restoresession.stash.appscode.com/wordpress-db-restore created
Now, wait for the RestoreSession phase to go into Succeeded state,
$ kubectl get restoresession -n demo -w
NAME                   REPOSITORY   PHASE     AGE
wordpress-db-restore   gcs-repo     Running   10s
wordpress-db-restore   gcs-repo     Succeeded   89s
So, we can see that Stash has successfully restored the database.
Verify Restored Data :
Let’s verify whether the sample post has been restored or not,
$ kubectl exec -n demo wordpress-db-58657b89b9-kgt76 -- mysql --user=root --password=mysqlpass -e "SELECT post_name FROM wordpress.wp_posts;"
mysql: [Warning] Using a password on the command line interface can be insecure.
post_name
hello-world
sample-page
privacy-policy

stash-batch-backup-test
5-revision-v1
We can see from the above output that the stash-batch-backup-test post has been restored. Now, if you navigate to the WordPress site in a browser, you should see the post again.
Cleaning Up
To clean up the Kubernetes resources created by this tutorial, run:
kubectl delete -n demo backupbatch wordpress-backup
kubectl delete -n demo restorebatch wordpress-restore
kubectl delete -n demo restoresession wordpress-db-restore

kubectl delete -n demo deployment wordpress-db
kubectl delete -n demo deployment wordpress-app
kubectl delete -n demo repository gcs-repo
kubectl delete -n demo pvc --all
kubectl delete -n demo service --all