


You are looking at the documentation of a prior release. To read the documentation of the latest release, please
visit here.
Backup & Restore an Etcd Cluster with TLS
Stash v2021.10.11 supports backup and restoration of Etcd database. This guide will show you how you can backup & restore a TLS secured Etcd cluster using Stash.
Before You Begin
- At first, you need to have a Kubernetes cluster, and the
kubectlcommand-line tool must be configured to communicate with your cluster. - Install Stash Enterprise in your cluster following the steps here.
- If you are not familiar with how Stash backup and restore Etcd databases, please check the following guide here.
You have to be familiar with following custom resources:
To keep things isolated, we are going to use a separate namespace called demo throughout this tutorial. Create demo namespace if you haven’t created already.
$ kubectl create ns demo
namespace/demo created
Note: YAML files used in this tutorial are stored here.
Prepare Etcd
In this section, we are going to deploy a TLS secured Etcd cluster. Then, we will insert some sample data into the cluster.
Create Certificates
Let’s create certificates that our Etcd cluster will use for authenticating client requests and peer communications. We will be using Etcd recommended cfssl tool for creating our necessary certificates.
If you have go installed on your machine, you can run the following commands to install cfssl,
$ go get github.com/cloudflare/cfssl/cmd/cfssl
$ go get github.com/cloudflare/cfssl/cmd/cfssljson
To create the necessary certificates using cfssl you can follow the commands below.
$ echo '{"CN":"CA","key":{"algo":"rsa","size":2048}}' | cfssl gencert  -initca - | cfssljson -bare ca -


$ echo '{"signing":{"default":{"expiry":"43800h","usages":["signing","key encipherment","server auth","client auth", "any"]}}}' > ca-config.json


$ export ADDRESS='127.0.0.1,0.0.0.0,etcd-tls-0.etcd,etcd-tls-1.etcd,etcd-tls-2.etcd,etcd'

$ export NAME=server

$ echo '{"CN":"'$NAME'","hosts":[""],"key":{"algo":"rsa","size":2048}}' | cfssl gencert -config=ca-config.json -ca=ca.pem -ca-key=ca-key.pem -hostname="$ADDRESS" - |  cfssljson -bare $NAME


$ export NAME=client

$ echo '{"CN":"'$NAME'","hosts":[""],"key":{"algo":"rsa","size":2048}}' | cfssl gencert -config=ca-config.json -ca=ca.pem -ca-key=ca-key.pem -hostname="$ADDRESS" - | cfssljson -bare $NAME
We have stored our SANs in the ADDRESS variable here. The above commands should create 5 certificates named ca.pem, server.pem, server-key.pem, client.pem, and client-key.pem. The ca.pem is a self-signed CA certificate. Rest of the certificates are signed by this CA.
Create Secret
Let’s create a generic Secret with the certificates created above.
$ kubectl create secret generic -n demo etcd-server-certs\
                     --from-file=./ca.pem\
                     --from-file=./server.pem\
                     --from-file=./server-key.pem\
                     --from-file=./client.pem\
                     --from-file=./client-key.pem

secret/etcd-server-certs created
Deploy Etcd
At first, let’s deploy an Etcd cluster. Here, we will use a StatefulSet and a Service to deploy an Etcd cluster consisting of three members. The Service is used for handling peer communications and client requests.
Here, are the sample YAMLs that we are going to use to deploy the Etcd cluster,
apiVersion: v1
kind: Service
metadata:
  name: etcd
  namespace: demo
spec:
  clusterIP: None
  ports:
    - port: 2379
      name: client
    - port: 2380
      name: peer
  selector:
    app: etcd-tls
---
apiVersion: apps/v1
kind: StatefulSet
metadata:
  name: etcd-tls
  namespace: demo
  labels:
    app: etcd-tls
spec:
  serviceName: etcd
  replicas: 3
  selector:
    matchLabels:
      app: etcd-tls
  template:
    metadata:
      name: etcd-tls
      namespace: demo
      labels:
        app: etcd-tls
    spec:
      containers:
        - name: etcd
          image: gcr.io/etcd-development/etcd:v3.5.0
          ports:
            - containerPort: 2379
              name: client
            - containerPort: 2380
              name: peer
          volumeMounts:
            - name: data
              mountPath: /var/run/etcd
            - name: etcd-secret
              mountPath: /etc/etcd-secret
          command:
            - /bin/sh
            - -c
            - |
              PEERS="etcd-tls-0=https://etcd-tls-0.etcd:2380,etcd-tls-1=https://etcd-tls-1.etcd:2380,etcd-tls-2=https://etcd-tls-2.etcd:2380" ;\
              exec etcd --name ${HOSTNAME} \
                --listen-peer-urls https://0.0.0.0:2380 \
                --listen-client-urls https://0.0.0.0:2379 \
                --advertise-client-urls https://${HOSTNAME}.etcd:2379 \
                --initial-advertise-peer-urls https://${HOSTNAME}.etcd:2380 \
                --initial-cluster etcd-tls-0=https://etcd-tls-0.etcd:2380,etcd-tls-1=https://etcd-tls-1.etcd:2380,etcd-tls-2=https://etcd-tls-2.etcd:2380 \
                --initial-cluster-token etcd-cluster-1 \
                --data-dir /var/run/etcd \
                --client-cert-auth \
                --cert-file "/etc/etcd-secret/server.pem" \
                --key-file "/etc/etcd-secret/server-key.pem" \
                --trusted-ca-file "/etc/etcd-secret/ca.pem" \
                --peer-auto-tls
      volumes:
        - name: etcd-secret
          secret:
            secretName: etcd-server-certs
  volumeClaimTemplates:
    - metadata:
        name: data
        namespace: demo
      spec:
        storageClassName: standard
        accessModes: ["ReadWriteOnce"]
        resources:
          requests:
            storage: 1Gi
Let’s deploy the Etcd cluster we have shown above,
$ kubectl apply -f https://github.com/stashed/docs/tree/v2021.10.11/docs/addons/etcd/tls/examples/etcd.yaml
service/etcd created
statefulset.apps/etcd-tls created
Now, let’s wait for the database pods etcd-tls-0, etcd-tls-1, and etcd-tls-2 to go into Running state,
❯ kubectl get pods -n demo --selector=app=etcd-tls

NAME                READY   STATUS    RESTARTS   AGE
etcd-tls-0          1/1     Running   0          6m
etcd-tls-1          1/1     Running   0          6m
etcd-tls-2          1/1     Running   0          6m
Once the database pods are in Running state, verify that the Etcd cluster is ready to accept connections. Let’s exec into the etcd-tls-0 database pod and check cluster’s health.
❯ kubectl exec -it -n demo etcd-tls-0 -- /bin/sh

127.0.0.1:2379> etcdctl --cacert  /etc/etcd-secret/ca.pem --cert /etc/etcd-secret/client.pem --key /etc/etcd-secret/client-key.pem endpoint health
127.0.0.1:2379 is healthy: successfully committed proposal: took = 8.497131ms
We can see from the above output that our Etcd cluster is ready to accept connections.
Insert Sample Data
Now, we are going to exec into any of the database pods and insert some sample data.
Let’s exec into the etcd-tls-0 pod for inserting sample data.
❯ kubectl exec -it -n demo etcd-tls-0 -- /bin/sh
127.0.0.1:2379> etcdctl --cacert  /etc/etcd-secret/ca.pem --cert /etc/etcd-secret/client.pem --key /etc/etcd-secret/client-key.pem put foo bar
OK
127.0.0.1:2379> etcdctl --cacert  /etc/etcd-secret/ca.pem --cert /etc/etcd-secret/client.pem --key /etc/etcd-secret/client-key.pem put foo2 bar2
OK
127.0.0.1:2379> etcdctl --cacert  /etc/etcd-secret/ca.pem --cert /etc/etcd-secret/client.pem --key /etc/etcd-secret/client-key.pem put foo3 bar3
OK
127.0.0.1:2379> etcdctl --cacert  /etc/etcd-secret/ca.pem --cert /etc/etcd-secret/client.pem --key /etc/etcd-secret/client-key.pem put foo4 bar4
OK

# Verify that the data has been inserted successfully
127.0.0.1:2379> etcdctl --cacert  /etc/etcd-secret/ca.pem --cert /etc/etcd-secret/client.pem --key /etc/etcd-secret/client-key.pem get --prefix foo
foo
bar
foo2
bar2
foo3
bar3
foo4
bar4
127.0.0.1:2379> exit
We have successfully deployed an Etcd cluster and inserted some sample data into it. In the subsequent sections, we are going to backup these data using Stash.
Prepare for Backup
In this section, we are going to prepare the necessary resources (e.g., connection information, backend information, etc.) before backup.
Ensure Etcd Addon
When you install Stash Enterprise edition, it will automatically install all the official addons. Make sure that Etcd addon has been installed properly using the following command.
❯ kubectl get tasks.stash.appscode.com | grep etcd
etcd-backup-3.5.0             18m
etcd-restore-3.5.0            18m
This addon should be able to take backup of the databases with matching major versions as discussed in Addon Version Compatibility.
Create Secret
To access TLS secured Etcd cluster from Stash, we need to create a Secret. Let’s create the Secret containing client-key,pem and client.pem from the certificates we have created earlier.
kc create secret generic -n demo etcd-client-certs\
                          --from-file=./client.pem\
                          --from-file=./client-key.pem
secret/etcd-client-certs created
Create AppBinding
Stash needs to know how to connect with the Etcd cluster. An AppBinding exactly provides this information. It holds the Service and Secret information of the Etcd cluster. You have to point to the respective AppBinding as a target of backup instead of the Etcd cluster itself.
Here is the YAML of the AppBinding that we are going to create for the Etcd cluster we have deployed earlier.
apiVersion: appcatalog.appscode.com/v1alpha1
kind: AppBinding
metadata:
  name: etcd-appbinding
  namespace: demo
spec:
  clientConfig:
    caBundle: LS0tLS1CRUdJTiBDRVJUSUZJQ0FURS0tLS0tCk1JSUM2akNDQWRLZ0F3SUJBZ0lVZEJYNnU0RHRyNDA3WkZDTWN6Nzg4Y1YyWHVJd0RRWUpLb1pJaHZjTkFRRUwKQlFBd0RURUxNQWtHQTFVRUF4TUNRMEV3SGhjTk1qRXhNREU1TVRBeE56QXdXaGNOTWpZeE1ERTRNVEF4TnpBdwpXakFOTVFzd0NRWURWUVFERXdKRFFUQ0NBU0l3RFFZSktvWklodmNOQVFFQkJRQURnZ0VQQURDQ0FRb0NnZ0VCCkFMZmp6OEJhbDhpWTdjSTd2OHNFdndpSmJnQXBqTDIvNnVZbXBaQVZvcW50cjJCcmFMbTlCb1czdkMydm5tbWYKWDhRUFBsWnFIeUxzY1gxZUlpazJyWHJEYUdQaU45VHhLQXVrbWJjZXFsUXZScGNZZkVaVTBQMzhNc0xsQUlHaQpZamZxRjR5Z1UyMjA0L3FucVVPbFFjLzh2MmJpRFNSQXNUM1NUT2FVemdMd05KT20wOUlqT1dUQW15Q2xXWmxnClJmV2tETzVTQ0xZd1pmQ1Z1MTdBalJRMTNsZTdocW9GcW9SUW96dUZQMFp0dlVFdWVPSXlSa3ZlYTFRYVNyTjgKcm1aN1BaL0lIb3dyNjFtMFd0bVE3ckw1eTMyOTgxb3hRNGg2UHdLMGNGNVNyOG9WRUR0TGZVeE1OWHpoMXpRUAorY2FhZWlUWklyc1dqRGNxSm9VWk1wVUNBd0VBQWFOQ01FQXdEZ1lEVlIwUEFRSC9CQVFEQWdFR01BOEdBMVVkCkV3RUIvd1FGTUFNQkFmOHdIUVlEVlIwT0JCWUVGQ1FzZmsvcHJxWGwxKzhIODk1WUFmZzR2THQxTUEwR0NTcUcKU0liM0RRRUJDd1VBQTRJQkFRQmpOOHlxalhEaUdqaDFuUGdKVFpZa1FCa1E4SFZHeThIdlFWWG0zdFhHM3RLcApTaVdDQTlPbittR0xZZTlCMi9lOEFJNkIyMFB1Z0NZWHljMHVOb1RiSFdiZ01pNURiNEVZYXdDdVpkN3M4MXlUClRXY1N0VWZFeUdKNW1ycWZ6OFFPaUt0Sk1UeWFYbHllWllURnhnWUsyOThTcDhubFBRQlgzNVBDakZTbXZwa1UKY0N5TllYMDF1RnFhWE9FZTdkTnpBUmhIaU1xVFM0dkNUUnFrbFpMWHB6a3ViZER3WTVKK3gzYmptcDk1RUtmVwpJbkhERTJ2ckxsU0crZDVWNnBuUG54bXc3aGg2L0NMUTNVMXM3V1d0clVlSU9NUDdCcFJxRG05TjJhajJXUHNLCmpEYXdRcFpGdGhmbEdJR1ZqUUNCNFMwTkQzWWliSkVqdHZHMnBuTlkKLS0tLS1FTkQgQ0VSVElGSUNBVEUtLS0tLQ==
    Service:
      name: etcd
      port: 2379
      scheme: https
  secret:
    name: etcd-client-certs
  type: etcd
  version: 3.5.0
Here,
.spec.clientConfig.caBundlespecifies the base64 encoded CA certificate. Here, we have used the base64 encoded version of our previously generatedca.pemcertificate..spec.clientConfig.Servicespecifies the Service information to use to connect with the Etcd cluster..spec.secretspecifies the name of the Secret that holds the necessary client certificates..spec.typespecifies the type of the database.
Let’s create the AppBinding we have shown above,
$ kubectl apply -f https://github.com/stashed/docs/tree/v2021.10.11/docs/addons/etcd/tls/examples/appbinding.yaml
appbinding.appcatalog.appscode.com/etcd-appbinding created
Prepare Backend
We are going to store our backed up data into a GCS bucket. So, we need to create a Secret with GCS credentials and a Repository object with the bucket information. If you want to use a different backend, please read the respective backend configuration doc from here.
Create Storage Secret:
At first, let’s create a secret called gcs-secret with access credentials to our desired GCS bucket,
$ echo -n 'changeit' > RESTIC_PASSWORD
$ echo -n '<your-project-id>' > GOOGLE_PROJECT_ID
$ cat downloaded-sa-key.json > GOOGLE_SERVICE_ACCOUNT_JSON_KEY
$ kubectl create secret generic -n demo gcs-secret \
    --from-file=./RESTIC_PASSWORD \
    --from-file=./GOOGLE_PROJECT_ID \
    --from-file=./GOOGLE_SERVICE_ACCOUNT_JSON_KEY
secret/gcs-secret created
Create Repository:
Now, create a Repository object with the information of your desired bucket. Below is the YAML of Repository object we are going to create,
apiVersion: stash.appscode.com/v1alpha1
kind: Repository
metadata:
  name: gcs-repo
  namespace: demo
spec:
  backend:
    gcs:
      bucket: stash-testing
      prefix: /demo/etcd/etcd-tls
    storageSecretName: gcs-secret
Let’s create the Repository we have shown above,
$ kubectl create -f https://github.com/stashed/docs/raw/v2021.10.11/docs/addons/etcd/tls/examples/repository.yaml
repository.stash.appscode.com/gcs-repo created
Now, we are ready to backup our data into our desired backend.
Backup
To schedule a backup, we need to create a BackupConfiguration object targeting the respective AppBinding of our Etcd cluster. Then, Stash will create a CronJob to periodically backup the cluster.
Create BackupConfiguration
Below, is the YAML for BackupConfiguration object that we are going to use to backup the TLS enabled Etcd cluster we have deployed earlier,
apiVersion: stash.appscode.com/v1beta1
kind: BackupConfiguration
metadata:
  name: etcd-tls-backup
  namespace: demo
spec:
  schedule: "*/5 * * * *"
  task:
    name: etcd-backup-3.5.0
  repository:
    name: gcs-repo
  target:
    ref:
      apiVersion: appcatalog.appscode.com/v1alpha1
      kind: AppBinding
      name: etcd-appbinding
  retentionPolicy:
    name: keep-last-5
    keepLast: 5
    prune: true
Here,
.spec.schedulespecifies that we want to backup the streams at 5 minutes intervals..spec.task.namespecifies the name of the Task object that specifies the necessary Functions and their execution order to backup our Etcd cluster..spec.repository.namespecifies the Repository CR name we have created earlier with backend information..spec.target.refrefers to the AppBinding object that holds the connection information of our targeted Etcd cluster..spec.retentionPolicyspecifies a policy indicating how we want to cleanup the old backups.
Let’s create the BackupConfiguration object we have shown above,
$ kubectl create -f https://github.com/stashed/docs/raw/v2021.10.11/docs/addons/etcd/tls/examples/backupconfiguration.yaml
backupconfiguration.stash.appscode.com/etcd-tls-backup created
Verify CronJob
If everything goes well, Stash will create a CronJob with the schedule specified in spec.schedule field of BackupConfiguration object.
Verify that the CronJob has been created using the following command,
❯ kubectl get cronjob -n demo
NAME                                  SCHEDULE      SUSPEND   ACTIVE   LAST SCHEDULE   AGE
stash-trigger-etcd-tls-backup         */5 * * * *   False     0        <none>          65s
Wait for BackupSession
The stash-trigger-etcd-tls-backup CronJob will trigger a backup on each scheduled slot by creating a BackupSession object.
Now, wait for a schedule to appear. Run the following command to watch for BackupSession object,
❯ kubectl get backupsession -n demo -w
NAME                           INVOKER-TYPE          INVOKER-NAME             PHASE       DURATION   AGE
etcd-tls-backup-q2dk6          BackupConfiguration   etcd-tls-backup          Succeeded   41s        60s
Here, the phase Succeeded means that the backup process has been completed successfully.
Verify Backup
Now, we are going to verify whether the backed up data is present in the backend or not. Once a backup is completed, Stash will update the respective Repository object to reflect the backup completion. Check that the repository gcs-repo has been updated by the following command,
❯ kubectl get repository -n demo
NAME         INTEGRITY   SIZE        SNAPSHOT-COUNT   LAST-SUCCESSFUL-BACKUP   AGE
gcs-repo     true        42.105 KiB  2                2m10s                    47m
Now, if we navigate to the GCS bucket, we will see the backed up data has been stored in demo/nats/sample-nats-tls directory as specified by .spec.backend.gcs.prefix field of the Repository object.
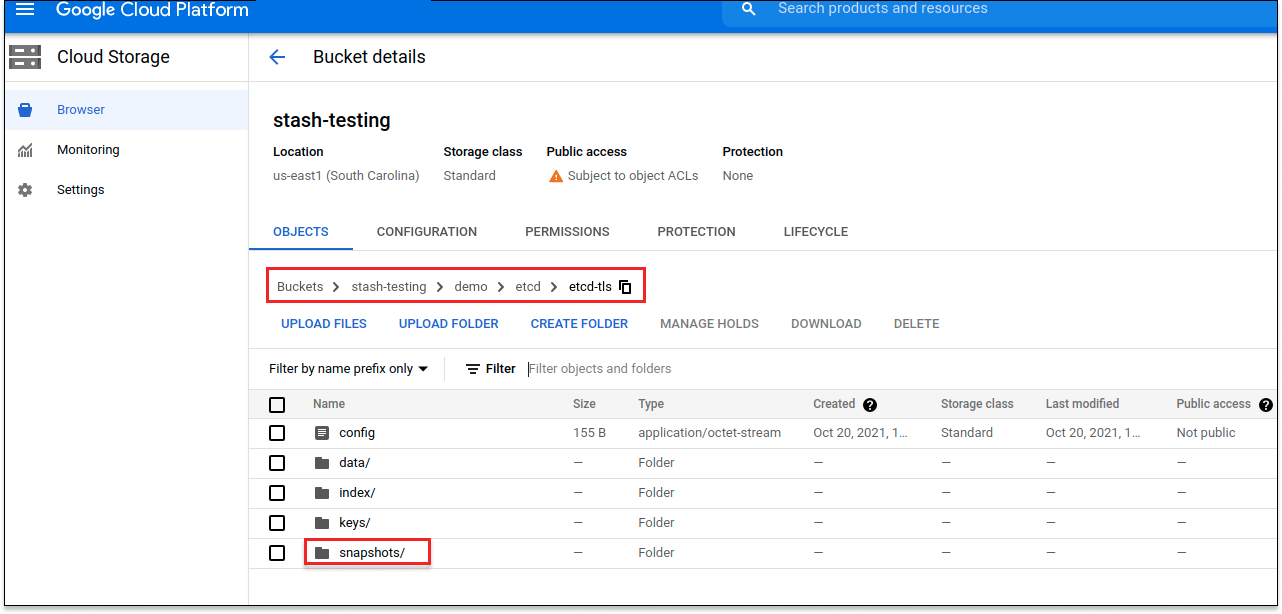
Note: Stash keeps all the backed up data encrypted. So, data in the backend will not make any sense until they are decrypted.
Restore Etcd
If you have followed the previous sections properly, you should have a successful backup of your TLS enabled Etcd cluster. Now, we are going to show how you can restore the Etcd cluster from the backup.
Restore Into the Same Etcd Cluster
You can restore your data into the same Etcd cluster you have taken backup from or into a different Etcd cluster. In this section, we are going to show you how to restore data in the same Etcd cluster which maybe necessary when you have accidentally deleted any data from the running cluster.
Temporarily Pause Backup
At first, let’s stop taking any further backup of the Etcd cluster so that no backup runs after we delete the sample data. We are going to pause the BackupConfiguration object. Stash will stop taking any further backup when the BackupConfiguration is paused.
Let’s pause the etcd-tls-backup BackupConfiguration,
$ kubectl patch backupconfiguration -n demo etcd-tls-backup --type="merge" --patch='{"spec": {"paused": true}}'
backupconfiguration.stash.appscode.com/etcd-tls-backup patched
Verify that the BackupConfiguration has been paused,
❯ kubectl get backupconfiguration -n demo etcd-tls-backup
NAME              TASK                SCHEDULE      PAUSED   AGE
etcd-tls-backup   etcd-backup-3.5.0   */5 * * * *   true     25m
Notice the PAUSED column. Value true for this field means that the BackupConfiguration has been paused.
Stash will also suspend the respective CronJob.
❯ kubectl get cronjob -n demo
NAME                            SCHEDULE      SUSPEND   ACTIVE   LAST SCHEDULE   AGE
stash-trigger-etcd-tls-backup   */5 * * * *   True      0        6m25s           95m
Simulate Disaster
Now, let’s simulate an accidental deletion scenario. Here, we are going to exec into the etcd-tls-0 database pod and delete the sample data we have inserted earlier.
❯ kubectl exec -it -n demo etcd-tls-0 -- /bin/sh
127.0.0.1:2379> etcdctl --cacert  /etc/etcd-secret/ca.pem --cert /etc/etcd-secret/client.pem --key /etc/etcd-secret/client-key.pem del foo
1
127.0.0.1:2379> etcdctl --cacert  /etc/etcd-secret/ca.pem --cert /etc/etcd-secret/client.pem --key /etc/etcd-secret/client-key.pem del foo2
1
127.0.0.1:2379> etcdctl --cacert  /etc/etcd-secret/ca.pem --cert /etc/etcd-secret/client.pem --key /etc/etcd-secret/client-key.pem del foo3
1
127.0.0.1:2379> etcdctl --cacert  /etc/etcd-secret/ca.pem --cert /etc/etcd-secret/client.pem --key /etc/etcd-secret/client-key.pem del foo4
1

# Verify that the data has been deleted successfully
127.0.0.1:2379> etcdctl --cacert  /etc/etcd-secret/ca.pem --cert /etc/etcd-secret/client.pem --key /etc/etcd-secret/client-key.pem get --prefix foo
(nil)
127.0.0.1:2379> exit
Create RestoreSession
To restore the database, you have to create a RestoreSession object pointing to the AppBinding of the targeted database.
Here, is the YAML of the RestoreSession object that we are going to use for restoring our Etcd database cluster.
apiVersion: stash.appscode.com/v1beta1
kind: RestoreSession
metadata:
  name: etcd-tls-restore
  namespace: demo
spec:
  task:
    name: etcd-restore-3.5.0
    params:
      - name: initialCluster
        value:  "etcd-tls-0=https://etcd-tls-0.etcd:2380,etcd-tls-1=https://etcd-tls-1.etcd:2380,etcd-tls-2=https://etcd-tls-2.etcd:2380"
      - name: initialClusterToken
        value: "etcd-cluster-1"
      - name: dataDir
        value: "/var/run/etcd"
      - name: workloadKind
        value: "StatefulSet"
      - name: workloadName
        value: "etcd-tls"
  repository:
    name: gcs-repo
  target:
    ref:
      apiVersion: appcatalog.appscode.com/v1alpha1
      kind: AppBinding
      name: etcd-appbinding
  runtimeSettings:
    container:
      securityContext:
        runAsUser: 0
        runAsGroup: 0
  rules:
  - snapshots: [latest]
Here,
.spec.task.namespecifies the name of the Task object that specifies the necessary Functions and their execution order to restore an Etcd database..spec.task.paramsrefers to the names and values of the Params objects specifying necessary parameters and their values for restoring backup data into an Etcd cluster. We need to specify the folowing parameters,initialclusterparameter refers to the initial cluster configuration of the Etcd cluster and it must be the same as the initial cluster configuration of the deployed Etcd cluster.dataDirparameter refers to the datadir of the deployed Etcd cluster where the backed up data will get restored.workloadKindparameter refers to the workload e.g. Pod/StatefulSet we have used to deploy the Etcd cluster.workloadNameparameter refers to the workload name we have used to deploy the Etcd cluster.
.spec.repository.namespecifies the Repository object that holds the backend information where our backed up data has been stored..spec.target.refrefers to the respective AppBinding of the Etcd database..spec.rulesspecifies that we are restoring data from the latest backup snapshot of the database.- The restore Job need access to the respective volume of the Etcd database. As a result, we have to run the restore Job as the same user as the Etcd database or as root user. Here, we are running the restore Job as root user using
spec.runtimeSettings.Container.securityContextsection.
Let’s create the RestoreSession object object we have shown above,
$ kubectl apply -f https://github.com/stashed/docs/raw/v2021.10.11/docs/addons/etcd/tls/examples/restoresession.yaml
restoresession.stash.appscode.com/etcd-tls-restore created
Once, you have created the RestoreSession object, Stash will create a restore Job. Run the following command to watch the phase of the RestoreSession object,
❯ kubectl get restoresession -n demo -w
NAME               REPOSITORY   PHASE     DURATION   AGE
etcd-tls-restore   gcs-repo     Running              5s
etcd-tls-restore   gcs-repo     Running              60s
etcd-tls-restore   gcs-repo     Running              2m3s
etcd-tls-restore   gcs-repo     Succeeded              2m3s
etcd-tls-restore   gcs-repo     Succeeded   2m3s       2m3s
The Succeeded phase means that the restore process has been completed successfully.
Verify Restored Data
Now, let’s exec into the etcd-tls-0 database pod and verify whether the actual data has been restored or not,
❯ kubectl exec -it -n demo etcd-tls-0 -- /bin/sh

127.0.0.1:2379> etcdctl --cacert  /etc/etcd-secret/ca.pem --cert /etc/etcd-secret/client.pem --key /etc/etcd-secret/client-key.pem get --prefix foo
foo
bar
foo2
bar2
foo3
bar3
foo4
bar4

127.0.0.1:2379> exit
Hence, we can see from the above output that the deleted data has been restored successfully from the backup.
Resume Backup
Since our data has been restored successfully we can now resume our usual backup process. Resume the BackupConfiguration using following command,
❯ kubectl patch backupconfiguration -n demo etcd-tls-backup --type="merge" --patch='{"spec": {"paused": false}}'
backupconfiguration.stash.appscode.com/etcd-tls-backup patched
Verify that the BackupConfiguration has been resumed,
❯ kubectl get backupconfiguration -n demo etcd-tls-backup
NAME              TASK                SCHEDULE      PAUSED   AGE
etcd-tls-backup   etcd-backup-3.5.0   */5 * * * *   false    39m
Here, false in the PAUSED column means the backup has been resumed successfully. The CronJob also should be resumed now.
❯ kubectl get cronjob -n demo
NAME                            SCHEDULE      SUSPEND   ACTIVE   LAST SCHEDULE   AGE
stash-trigger-etcd-tls-backup   */5 * * * *   False     0        2m39s           42m
Here, False in the SUSPEND column means the CronJob is no longer suspended and will trigger in the next schedule.
Restore Into Different Database of the Same Namespace
If you want to restore the backed up data into a different Etcd cluster of the same namespace, you have to create another AppBinding ppointing to the desired Etcd database. Then, you have to create the RestoreSession pointing to the new AppBinding.
Restore Into Different Namespace
If you want to restore into a different namespace of the same cluster, you have to create the Repository, backend Secret, AppBinding, in the desired namespace. You can use Stash kubectl plugin to easily copy the resources into a new namespace. Then, you have to create the RestoreSession object in the desired namespace pointing to the Repository, AppBinding of that namespace.
Restore Into Different Cluster
If you want to restore into a different cluster, you have to install Stash in the desired cluster. Then, you have to create the Repository, backend Secret, AppBinding, in the desired cluster. Finally, you have to create the RestoreSession object in the desired cluster pointing to the Repository, AppBinding of that cluster.
Cleanup
To cleanup the Kubernetes resources created by this tutorial, run:
kubectl delete -n demo backupconfiguration etcd-tls-backup
kubectl delete -n demo restoresession etcd-tls-restore
kubectl delete -n demo repository gcs-repo
kubectl delete -n demo appbinding etcd-appbinding
kubectl delete -n demo Secret gcs-secret
kubectl delete -n demo Secret etcd-client-certs
kubectl delete -n demo Secret etcd-server-certs
# delete the database, Service, and PVCs
kubectl delete -f https://github.com/stashed/docs/tree/v2021.10.11/docs/addons/etcd/tls/examples/etcd-tls.yaml
kubectl delete pvc -n demo data-etcd-tls-0 data-etcd-tls-1 data-etcd-tls-2