


You are looking at the documentation of a prior release. To read the documentation of the latest release, please
visit here.
Backup YAMLs of an Application using Stash
Stash v2022.06.27 supports taking backup of the resource YAMLs using kubedump plugin. This guide will show you how you can take a backup of the YAMLs of an application along with it’s dependant using Stash.
Before You Begin
- At first, you need to have a Kubernetes cluster, and the
kubectlcommand-line tool must be configured to communicate with your cluster. - Install Stash Enterprise in your cluster following the steps here.
- Install Stash
kubectlplugin in your local machine following the steps here. - If you are not familiar with how Stash backup the resource YAMLs, please check the following guide here.
You have to be familiar with the following custom resources:
To keep things isolated, we are going to use a separate namespace called demo throughout this tutorial. Create the demo namespace if you haven’t created it already.
$ kubectl create ns demo
namespace/demo created
Note: YAML files used in this tutorial are stored here.
Prepare for Backup
In this section, we are going to configure a backup for YAML definition of a Deployment along with its ReplicaSet and its Pods.
Ensure kubedump Addon
When you install the Stash Enterprise version, it will automatically install all the official addons. Make sure that kubedump addon was installed properly using the following command.
❯ kubectl get tasks.stash.appscode.com | grep kubedump
kubedump-backup-0.1.0          23s
Prepare Backend
We are going to store our backed-up data into a GCS bucket. So, we need to create a Secret with GCS credentials and a Repository object with the bucket information. If you want to use a different backend, please read the respective backend configuration doc from here.
Create Storage Secret:
At first, let’s create a secret called gcs-secret with access credentials to our desired GCS bucket,
$ echo -n 'changeit' > RESTIC_PASSWORD
$ echo -n '<your-project-id>' > GOOGLE_PROJECT_ID
$ cat downloaded-sa-json.key > GOOGLE_SERVICE_ACCOUNT_JSON_KEY
$ kubectl create secret generic -n demo gcs-secret \
    --from-file=./RESTIC_PASSWORD \
    --from-file=./GOOGLE_PROJECT_ID \
    --from-file=./GOOGLE_SERVICE_ACCOUNT_JSON_KEY
secret/gcs-secret created
Create Repository:
Now, crete a Repository object with the information of your desired bucket. Below is the YAML of Repository object we are going to create,
apiVersion: stash.appscode.com/v1alpha1
kind: Repository
metadata:
  name: application-resource-storage
  namespace: demo
spec:
  backend:
    gcs:
      bucket: stash-testing
      prefix: /manifests/applications/kube-system/stash-enterprise
    storageSecretName: gcs-secret
Let’s create the Repository we have shown above,
$ kubectl apply -f https://github.com/stashed/docs/raw/v2022.06.27/docs/addons/kubedump/application/examples/repository.yaml
repository.stash.appscode.com/application-resource-storage created
Create RBAC
The kubedump plugin requires read permission for the application resources. By default, Stash does not grant such permissions. We have to provide the necessary permissions manually.
Here, is the YAML of the ServiceAccount, ClusterRole, and ClusterRoleBinding that we are going to use for granting the necessary permissions.
apiVersion: v1
kind: ServiceAccount
metadata:
  name: cluster-resource-reader
  namespace: demo
---
apiVersion: rbac.authorization.k8s.io/v1
kind: ClusterRole
metadata:
  name: cluster-resource-reader
rules:
- apiGroups: ["*"]
  resources: ["*"]
  verbs: ["get","list"]
---
apiVersion: rbac.authorization.k8s.io/v1
kind: ClusterRoleBinding
metadata:
  name: cluster-resource-reader
subjects:
- kind: ServiceAccount
  name: cluster-resource-reader
  namespace: demo
roleRef:
  kind: ClusterRole
  name: cluster-resource-reader
  apiGroup: rbac.authorization.k8s.io
Here, we have give permission to read all the cluster resources. You can restrict this permission to a particular application resources only.
Let’s create the RBAC resources we have shown above,
❯ kubectl apply -f https://github.com/stashed/docs/raw/v2022.06.27/docs/addons/kubedump/application/examples/rbac.yaml
serviceaccount/cluster-resource-reader created
clusterrole.rbac.authorization.k8s.io/cluster-resource-reader created
clusterrolebinding.rbac.authorization.k8s.io/cluster-resource-reader created
Now, we are ready for backup. In the next section, we are going to schedule a backup for our cluster resources.
Backup
To schedule a backup, we have to create a BackupConfiguration object. Then Stash will create a CronJob to periodically backup the database.
At first, lets list available Deployment in kube-system namespace.
❯ kubectl get deployments -n kube-system
NAME                     READY   UP-TO-DATE   AVAILABLE   AGE
coredns                  2/2     2            2           13d
stash-stash-enterprise   1/1     1            1           30h
Here, we are going to setup backup YAMLs for stash-stash-enterprise Deployment.
Create BackupConfiguration
Below is the YAML for BackupConfiguration object we care going to use to backup the YAMLs of the cluster resources,
apiVersion: stash.appscode.com/v1beta1
kind: BackupConfiguration
metadata:
  name: application-manifest-backup
  namespace: demo
spec:
  schedule: "*/5 * * * *"
  task:
    name: kubedump-backup-0.1.0
    params:
      - name: includeDependants
        value: "true"
  repository:
    name: application-resource-storage
  target:
    ref:
      apiVersion: apps/v1
      kind: Deployment
      name: stash-stash-enterprise
      namespace: kube-system
  runtimeSettings:
    pod:
      serviceAccountName: cluster-resource-reader
  retentionPolicy:
    name: keep-last-5
    keepLast: 5
    prune: true
Here,
.spec.schedulespecifies that we want to backup the cluster resources at 5 minutes intervals..spec.task.namespecifies the name of the Task object that specifies the necessary Functions and their execution order to backup the resource YAMLs..spec.repository.namespecifies the Repository CR name we have created earlier with backend information..spec.targetspecifies the targeted application that we are going to backup..spec.runtimeSettings.pod.serviceAccountNamespecifies the ServiceAccount name that we have created earlier with cluster-wide resource reading permission..spec.retentionPolicyspecifies a policy indicating how we want to cleanup the old backups.
Let’s create the BackupConfiguration object we have shown above,
$ kubectl apply -f https://github.com/stashed/docs/raw/v2022.06.27/docs/addons/kubedump/application/examples/backupconfiguration.yaml
backupconfiguration.stash.appscode.com/application-manifest-backup created
Verify Backup Setup Successful
If everything goes well, the phase of the BackupConfiguration should be Ready. The Ready phase indicates that the backup setup is successful. Let’s verify the Phase of the BackupConfiguration,
❯ kubectl get backupconfiguration -n demo
NAME                          TASK                    SCHEDULE      PAUSED   PHASE   AGE
application-manifest-backup   kubedump-backup-0.1.0   */5 * * * *            Ready   2m46s
Verify CronJob
Stash will create a CronJob with the schedule specified in spec.schedule field of BackupConfiguration object.
Verify that the CronJob has been created using the following command,
❯ kubectl get cronjob -n demo
NAME                                             SCHEDULE      SUSPEND   ACTIVE   LAST SCHEDULE   AGE
stash-trigger-demo-application-manifest-backup   */5 * * * *   False     0        <none>          36s
Wait for BackupSession
The stash-trigger-application-manifest-backup CronJob will trigger a backup on each scheduled slot by creating a BackupSession object.
Now, wait for a schedule to appear. Run the following command to watch for a BackupSession object,
❯ kubectl get backupsession -n demo -w
NAME                                     INVOKER-TYPE          INVOKER-NAME                  PHASE   DURATION   AGE
application-manifest-backup-1652269801   BackupConfiguration   application-manifest-backup                      0s
application-manifest-backup-1652269801   BackupConfiguration   application-manifest-backup   Pending              0s
application-manifest-backup-1652269801   BackupConfiguration   application-manifest-backup   Running              0s
application-manifest-backup-1652269801   BackupConfiguration   application-manifest-backup   Succeeded   59s        59s
Here, the phase Succeeded means that the backup process has been completed successfully.
Verify Backup
Now, we are going to verify whether the backed-up data is present in the backend or not. Once a backup is completed, Stash will update the respective Repository object to reflect the backup completion. Check that the repository application-resource-storage has been updated by the following command,
❯ kubectl get repository -n demo
NAME                           INTEGRITY   SIZE         SNAPSHOT-COUNT   LAST-SUCCESSFUL-BACKUP   AGE
application-resource-storage   true        14.902 KiB   1                61s                      11m
Now, if we navigate to the GCS bucket, we will see the backed up data has been stored in /manifest/applications/kube-system/stash-enterprise directory as specified by .spec.backend.gcs.prefix field of the Repository object.
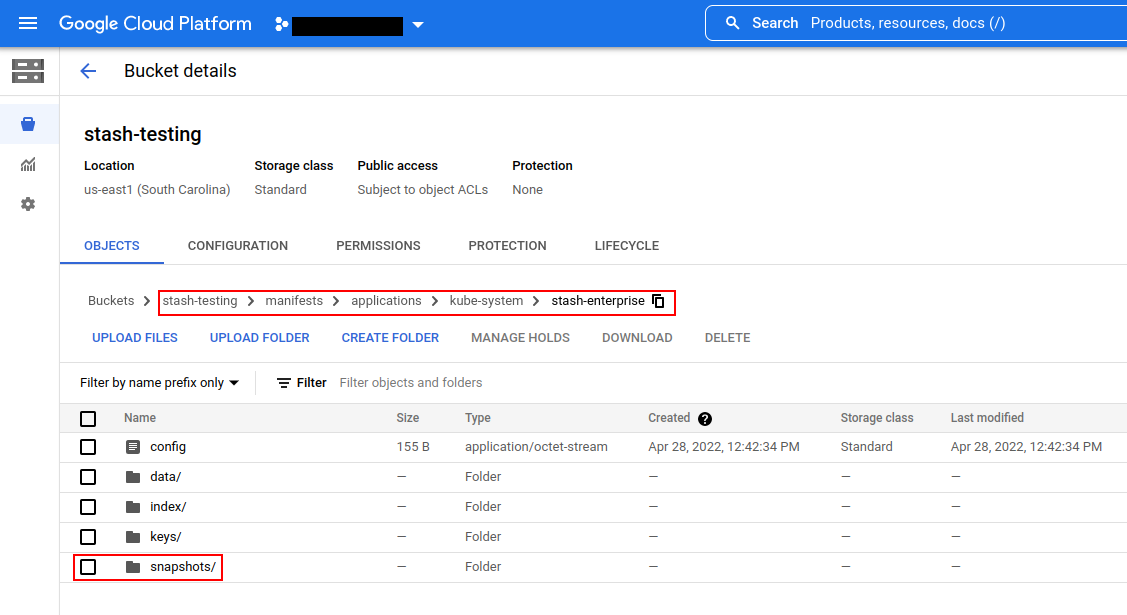
Note: Stash keeps all the backed-up data encrypted. So, data in the backend will not make any sense until they are decrypted.
Restore
Stash does not provide any automatic mechanism to restore the cluster resources from the backed-up YAMLs. Your application might be managed by Helm or by an operator. In such cases, just applying the YAMLs is not enough to restore the application. Furthermore, there might be an order issue. Some resources must be applied before others. It is difficult to generalize and codify various application-specific logic.
Therefore, it is the user’s responsibility to download the backed-up YAMLs and take the necessary steps based on his application to restore it properly.
Download the YAMLs
Stash provides a kubectl plugin for making it easy to download a snapshot locally.
Now, let’s download the latest Snapshot from our backed-up data into the $HOME/Downloads/stash/applications/kube-system/stash-enterprise folder of our local machine.
❯ kubectl stash download -n demo application-resource-storage --destination=$HOME/Downloads/stash/applications/kube-system/stash-enterprise --snapshots="latest"
Now, lets use tree command to inspect downloaded YAMLs files.
❯ tree $HOME/Downloads/stash/applications/kube-system/stash-enterprise
/home/emruz/Downloads/stash/applications/kube-system/stash-enterprise
└── latest
    └── tmp
        └── resources
            ├── ReplicaSet
            │   └── stash-stash-enterprise-567dd95f5b
            │       ├── Pod
            │       │   └── stash-stash-enterprise-567dd95f5b-6xtxg
            │       │       └── stash-stash-enterprise-567dd95f5b-6xtxg.yaml
            │       └── stash-stash-enterprise-567dd95f5b.yaml
            └── stash-stash-enterprise.yaml

7 directories, 3 files
As you can see that the Deployment has been backed up along with it’s ReplicaSet and Pods.
Let’s inspect the YAML of stash-stash-enterprise.yaml file,
❯ cat $HOME/Downloads/stash/applications/kube-system/stash-enterprise/latest/tmp/resources/stash-stash-enterprise.yaml
apiVersion: apps/v1
kind: Deployment
metadata:
  annotations:
    deployment.kubernetes.io/revision: "1"
    meta.helm.sh/release-name: stash
    meta.helm.sh/release-namespace: kube-system
  labels:
    app.kubernetes.io/instance: stash
    app.kubernetes.io/managed-by: Helm
    app.kubernetes.io/name: stash-enterprise
    app.kubernetes.io/version: v0.20.0
    helm.sh/chart: stash-enterprise-v0.20.0
  name: stash-stash-enterprise
  namespace: kube-system
spec:
  progressDeadlineSeconds: 600
  replicas: 1
  revisionHistoryLimit: 10
  selector:
    matchLabels:
      app.kubernetes.io/instance: stash
      app.kubernetes.io/name: stash-enterprise
  strategy:
    rollingUpdate:
      maxSurge: 25%
      maxUnavailable: 25%
    type: RollingUpdate
  template:
    metadata:
      annotations:
        checksum/apiregistration.yaml: ea1443f1d9a807c14104b3e24ca051acb32c215743fde21c682ccb1876deee8d
      labels:
        app.kubernetes.io/instance: stash
        app.kubernetes.io/name: stash-enterprise
    spec:
      containers:
      - args:
        - run
        - --v=3
        - --docker-registry=stashed
        - --image=stash-enterprise
        - --image-tag=v0.20.0
        - --secure-port=8443
        - --audit-log-path=-
        - --tls-cert-file=/var/serving-cert/tls.crt
        - --tls-private-key-file=/var/serving-cert/tls.key
        - --pushgateway-url=http://stash-stash-enterprise.kube-system.svc:56789
        - --enable-mutating-webhook=true
        - --enable-validating-webhook=true
        - --bypass-validating-webhook-xray=false
        - --use-kubeapiserver-fqdn-for-aks=true
        - --cron-job-psp=baseline
        - --backup-job-psp=baseline
        - --restore-job-psp=baseline
        - --nva-cpu=100m
        - --nva-memory=128Mi
        - --nva-user=2000
        - --nva-privileged-mode=false
        - --nva-psp=baseline
        - --license-file=/var/run/secrets/appscode/license/key.txt
        - --license-apiservice=v1beta1.admission.stash.appscode.com
        env:
        - name: POD_NAME
          valueFrom:
            fieldRef:
              apiVersion: v1
              fieldPath: metadata.name
        - name: POD_NAMESPACE
          valueFrom:
            fieldRef:
              apiVersion: v1
              fieldPath: metadata.namespace
        image: stashed/stash-enterprise:v0.20.0
        imagePullPolicy: IfNotPresent
        name: operator
        ports:
        - containerPort: 8443
          protocol: TCP
        resources:
          requests:
            cpu: 100m
        securityContext: {}
        terminationMessagePolicy: File
        volumeMounts:
        - mountPath: /var/serving-cert
          name: serving-cert
        - mountPath: /var/run/secrets/appscode/license
          name: license
      - args:
        - --web.listen-address=:56789
        - --persistence.file=/var/pv/pushgateway.dat
        image: prom/pushgateway:v1.4.2
        imagePullPolicy: IfNotPresent
        name: pushgateway
        ports:
        - containerPort: 56789
          protocol: TCP
        resources: {}
        securityContext: {}
        terminationMessagePolicy: File
        volumeMounts:
        - mountPath: /var/pv
          name: data-volume
        - mountPath: /tmp
          name: stash-scratchdir
      nodeSelector:
        kubernetes.io/os: linux
      restartPolicy: Always
      schedulerName: default-scheduler
      securityContext:
        fsGroup: 65535
      serviceAccount: stash-stash-enterprise
      serviceAccountName: stash-stash-enterprise
      volumes:
      - emptyDir: {}
        name: data-volume
      - emptyDir: {}
        name: stash-scratchdir
      - name: serving-cert
        secret:
          defaultMode: 420
          secretName: stash-stash-enterprise-apiserver-cert
      - name: license
        secret:
          defaultMode: 420
          secretName: stash-stash-enterprise-license
Now, you can use these YAML files to re-create your desired application.
Cleanup
To cleanup the Kubernetes resources created by this tutorial, run:
kubectl delete -n demo backupconfiguration application-manifest-backup
kubectl delete -n demo repository application-resource-storage
kubectl delete -n demo serviceaccount cluster-resource-reader
kubectl delete -n demo clusterrole cluster-resource-reader
kubectl delete -n demo clusterrolebinding cluster-resource-reader