


You are looking at the documentation of a prior release. To read the documentation of the latest release, please
visit here.
Backup and Restore PostgreSQL database using Stash
Stash 0.9.0+ supports backup and restoration of PostgreSQL databases. This guide will show you how you can backup and restore your PostgreSQL database with Stash.
Before You Begin
- At first, you need to have a Kubernetes cluster, and the
kubectlcommand-line tool must be configured to communicate with your cluster. If you do not already have a cluster, you can create one by using Minikube. - Install Stash in your cluster following the steps here.
- Install KubeDB in your cluster following the steps here. This step is optional. You can deploy your database using any method you want. We are using KubeDB because KubeDB simplifies many of the difficult or tedious management tasks of running production-grade databases on private and public clouds.
- If you are not familiar with how Stash backup and restore PostgreSQL databases, please check the following guide here:
You have to be familiar with following custom resources:
To keep things isolated, we are going to use a separate namespace called demo throughout this tutorial. Create the demo namespace if you haven’t created it already.
$ kubectl create ns demo
namespace/demo created
Note: YAML files used in this tutorial are stored here.
Backup PostgreSQL
This section will demonstrate how to backup a PostgreSQL database. Here, we are going to deploy a PostgreSQL database using KubeDB. Then, we are going to backup this database into a GCS bucket. Finally, we are going to restore the backed-up data into another PostgreSQL database.
Deploy Sample PostgreSQL Database
Let’s deploy a sample PostgreSQL database and insert some data into it.
Create Postgres CRD:
Below is the YAML of a sample Postgres crd that we are going to create for this tutorial:
apiVersion: kubedb.com/v1alpha2
kind: Postgres
metadata:
  name: sample-postgres
  namespace: demo
spec:
  version: "11.11"
  storageType: Durable
  storage:
    storageClassName: "standard"
    accessModes:
    - ReadWriteOnce
    resources:
      requests:
        storage: 1Gi
  terminationPolicy: Delete
Create the above Postgres crd,
$ kubectl apply -f https://github.com/stashed/docs/raw/v2023.03.20/docs/addons/postgres/standalone/examples/postgres.yaml
postgres.kubedb.com/sample-postgres created
KubeDB will deploy a PostgreSQL database according to the above specification. It will also create the necessary secrets and services to access the database.
Let’s check if the database is ready to use,
❯ kubectl get pg -n demo sample-postgres
NAME              VERSION   STATUS   AGE
sample-postgres   11.2-v1   Ready    50s
The database is Ready. Verify that KubeDB has created a Secret and a Service for this database using the following commands,
❯ kubectl get secret -n demo -l=app.kubernetes.io/instance=sample-postgres
NAME                   TYPE                       DATA   AGE
sample-postgres-auth   kubernetes.io/basic-auth   2      2m42s


❯ kubectl get service -n demo -l=app.kubernetes.io/instance=sample-postgres
NAME                   TYPE        CLUSTER-IP    EXTERNAL-IP   PORT(S)    AGE
sample-postgres        ClusterIP   10.96.242.0   <none>        5432/TCP   3m9s
sample-postgres-pods   ClusterIP   None          <none>        5432/TCP   3m9s
Here, we have to use the service sample-postgres and secret sample-postgres-auth to connect with the database. KubeDB creates an AppBinding crd that holds the necessary information to connect with the database.
Verify AppBinding:
Verify that the AppBinding has been created successfully using the following command,
❯ kubectl get appbindings -n demo
NAME              TYPE                  VERSION   AGE
sample-postgres   kubedb.com/postgres   11.2      3m54s
Let’s check the YAML of the above AppBinding,
❯ kubectl get appbindings -n demo sample-postgres -o yaml
apiVersion: appcatalog.appscode.com/v1alpha1
kind: AppBinding
metadata:
  labels:
    app.kubernetes.io/component: database
    app.kubernetes.io/instance: sample-postgres
    app.kubernetes.io/managed-by: kubedb.com
    app.kubernetes.io/name: postgreses.kubedb.com
  name: sample-postgres
  namespace: demo
  ...
spec:
  clientConfig:
    service:
      name: sample-postgres
      path: /
      port: 5432
      query: sslmode=disable
      scheme: postgresql
  secret:
    name: sample-postgres-auth
  type: kubedb.com/postgres
  version: "11.2"
Stash uses the AppBinding crd to connect with the target database. It requires the following two fields to set in AppBinding’s Spec section.
spec.clientConfig.service.namespecifies the name of the service that connects to the database.spec.secretspecifies the name of the secret that holds necessary credentials to access the database.spec.typespecifies the types of the app that this AppBinding is pointing to. KubeDB generated AppBinding follows the following format:<app group>/<app resource type>.
Creating AppBinding Manually:
If you deploy the PostgreSQL database without KubeDB, you have to create the AppBinding crd manually in the same namespace as the service and secret of the database.
The following YAML shows a minimal AppBinding specification that you have to create if you deploy the PostgreSQL database without KubeDB.
apiVersion: appcatalog.appscode.com/v1alpha1
kind: AppBinding
metadata:
  name: my-custom-appbinding
  namespace: my-database-namespace
spec:
  clientConfig:
    service:
      name: my-database-service
      port: 5432
      scheme: postgresql
  secret:
    name: my-database-credentials-secret
  # type field is optional. you can keep it empty.
  # if you keep it empty then the value of TARGET_APP_RESOURCE variable
  # will be set to "appbinding" during auto-backup.
  type: postgres
Stash expects your database secret to have username and password keys. If your database secret has different keys, you can map them to the Stash recommended keys using secretTransformation section of the AppBinding. An example of such transformation is shown below,
apiVersion: appcatalog.appscode.com/v1alpha1
kind: AppBinding
metadata:
  name: my-custom-appbinding
  namespace: my-database-namespace
spec:
  clientConfig:
    service:
      name: my-database-service
      port: 5432
      scheme: postgresql
  secret:
    name: my-database-credentials-secret
  secretTransforms:
  - renameKey:
      from: POSTGRES_USER
      to: username
  - renameKey:
      from: POSTGRES_PASSWORD
      to: password
  type: postgres
The
secretTransformsdoes not modify your original database Secret. Stash just uses those transformations to obtain the desired keys from the original Secret.
Insert Sample Data:
Now, we are going to exec into the database pod and create some sample data. At first, find out the database pod using the following command,
❯ kubectl get pods -n demo --selector="app.kubernetes.io/instance=sample-postgres"
NAME                READY   STATUS    RESTARTS   AGE
sample-postgres-0   1/1     Running   0          18m
Now, let’s exec into the pod and create a table,
❯ kubectl exec -it -n demo sample-postgres-0 -- sh

# login as "postgres" superuser.
/ # psql -U postgres
psql (11.2)
Type "help" for help.

# list available databases
postgres=# \l
                                 List of databases
   Name    |  Owner   | Encoding |  Collate   |   Ctype    |   Access privileges
-----------+----------+----------+------------+------------+-----------------------
 postgres  | postgres | UTF8     | en_US.utf8 | en_US.utf8 |
 template0 | postgres | UTF8     | en_US.utf8 | en_US.utf8 | =c/postgres          +
           |          |          |            |            | postgres=CTc/postgres
 template1 | postgres | UTF8     | en_US.utf8 | en_US.utf8 | =c/postgres          +
           |          |          |            |            | postgres=CTc/postgres
(3 rows)

# create a database named "demo"
postgres=# create database demo;
CREATE DATABASE

# verify that the "demo" database has been created
postgres=# \l
                                 List of databases
   Name    |  Owner   | Encoding |  Collate   |   Ctype    |   Access privileges
-----------+----------+----------+------------+------------+-----------------------
 demo      | postgres | UTF8     | en_US.utf8 | en_US.utf8 |
 postgres  | postgres | UTF8     | en_US.utf8 | en_US.utf8 |
 template0 | postgres | UTF8     | en_US.utf8 | en_US.utf8 | =c/postgres          +
           |          |          |            |            | postgres=CTc/postgres
 template1 | postgres | UTF8     | en_US.utf8 | en_US.utf8 | =c/postgres          +
           |          |          |            |            | postgres=CTc/postgres
(4 rows)

# connect to the "demo" database
postgres=# \c demo
You are now connected to database "demo" as user "postgres".

# create a sample table
demo=# CREATE TABLE COMPANY( NAME TEXT NOT NULL, EMPLOYEE INT NOT NULL);
CREATE TABLE

# verify that the table has been created
demo=# \d
          List of relations
 Schema |  Name   | Type  |  Owner
--------+---------+-------+----------
 public | company | table | postgres
(1 row)

# quit from the database
demo=# \q

# exit from the pod
/ # exit
Now, we are ready to backup this sample database.
Prepare Backend
We are going to store our backed-up data into a GCS bucket. At first, we need to create a secret with GCS credentials then we need to create a Repository crd. If you want to use a different backend, please read the respective backend configuration doc from here.
Create Storage Secret:
Let’s create a secret called gcs-secret with access credentials to our desired GCS bucket,
$ echo -n 'changeit' > RESTIC_PASSWORD
$ echo -n '<your-project-id>' > GOOGLE_PROJECT_ID
$ cat downloaded-sa-json.key > GOOGLE_SERVICE_ACCOUNT_JSON_KEY
$ kubectl create secret generic -n demo gcs-secret \
    --from-file=./RESTIC_PASSWORD \
    --from-file=./GOOGLE_PROJECT_ID \
    --from-file=./GOOGLE_SERVICE_ACCOUNT_JSON_KEY
secret/gcs-secret created
Create Repository:
Now, crete a Repository using this secret. Below is the YAML of Repository crd we are going to create,
apiVersion: stash.appscode.com/v1alpha1
kind: Repository
metadata:
  name: gcs-repo
  namespace: demo
spec:
  backend:
    gcs:
      bucket: stash-testing
      prefix: demo/postgres/sample-postgres
    storageSecretName: gcs-secret
Let’s create the Repository we have shown above,
$ kubectl apply -f https://github.com/stashed/docs/raw/v2023.03.20/docs/addons/postgres/standalone/examples/repository.yaml
repository.stash.appscode.com/gcs-repo created
Now, we are ready to backup our database to our desired backend.
Backup
We have to create a BackupConfiguration targeting the respective AppBinding object of our desired database. Stash will create a CronJob to periodically backup the database.
Create BackupConfiguration:
Below is the YAML for BackupConfiguration crd to backup the sample-postgres database we have deployed earlier.,
apiVersion: stash.appscode.com/v1beta1
kind: BackupConfiguration
metadata:
  name: sample-postgres-backup
  namespace: demo
spec:
  schedule: "*/5 * * * *"
  task:
    name: postgres-backup-11.9
  repository:
    name: gcs-repo
  target:
    ref:
      apiVersion: appcatalog.appscode.com/v1alpha1
      kind: AppBinding
      name: sample-postgres
  retentionPolicy:
    name: keep-last-5
    keepLast: 5
    prune: true
Here,
spec.schedulespecifies that we want to backup the database at 5 minutes interval.spec.task.namespecifies the name of the task crd that specifies the necessary Function and their execution order to backup a PostgreSQL database.spec.repository.namespecifies the name of theRepositorycrd the holds the backend information where the backed up data will be stored.spec.target.refrefers to theAppBindingcrd that was created forsample-postgresdatabase.spec.retentionPolicyspecifies the policy to follow for cleaning old snapshots.
Let’s create the BackupConfiguration object we have shown above,
$ kubectl apply -f https://github.com/stashed/docs/raw/v2023.03.20/docs/addons/postgres/standalone/examples/backupconfiguration.yaml
backupconfiguration.stash.appscode.com/sample-postgres-backup created
Verify Backup Setup Successful
If everything goes well, the phase of the BackupConfiguration should be Ready. The Ready phase indicates that the backup setup is successful. Let’s verify the Phase of the BackupConfiguration,
$ kubectl get backupconfiguration -n demo
NAME                     TASK                       SCHEDULE      PAUSED   PHASE      AGE
sample-postgres-backup   postgres-backup-11.9       */5 * * * *            Ready      11s
Verify CronJob:
Stash will create a CronJob with the schedule specified in spec.schedule field of BackupConfiguration crd.
Verify that the CronJob has been created using the following command,
❯ kubectl get cronjob -n demo
NAME                                  SCHEDULE      SUSPEND   ACTIVE   LAST SCHEDULE   AGE
stash-backup-sample-postgres-backup   */5 * * * *   False     0        <none>          30s
Wait for BackupSession:
The sample-postgres-backup CronJob will trigger a backup on each scheduled slot by creating a BackupSession crd.
Wait for a schedule to appear. Run the following command to watch BackupSession crd,
❯ kubectl get backupsession -n demo -w
NAME                                INVOKER-TYPE          INVOKER-NAME             PHASE       AGE
sample-postgres-backup-1613390711   BackupConfiguration   sample-postgres-backup   Running     15s
sample-postgres-backup-1613390711   BackupConfiguration   sample-postgres-backup   Succeeded   78s
We can see above that the backup session has succeeded. Now, we are going to verify that the backed up data has been stored in the backend.
Verify Backup:
Once a backup is complete, Stash will update the respective Repository object to reflect the backup completion. Check that the repository gcs-repo has been updated by the following command,
❯ kubectl get repository -n demo gcs-repo
NAME       INTEGRITY   SIZE        SNAPSHOT-COUNT   LAST-SUCCESSFUL-BACKUP   AGE
gcs-repo   true        1.770 KiB   1                2m                       4m16s
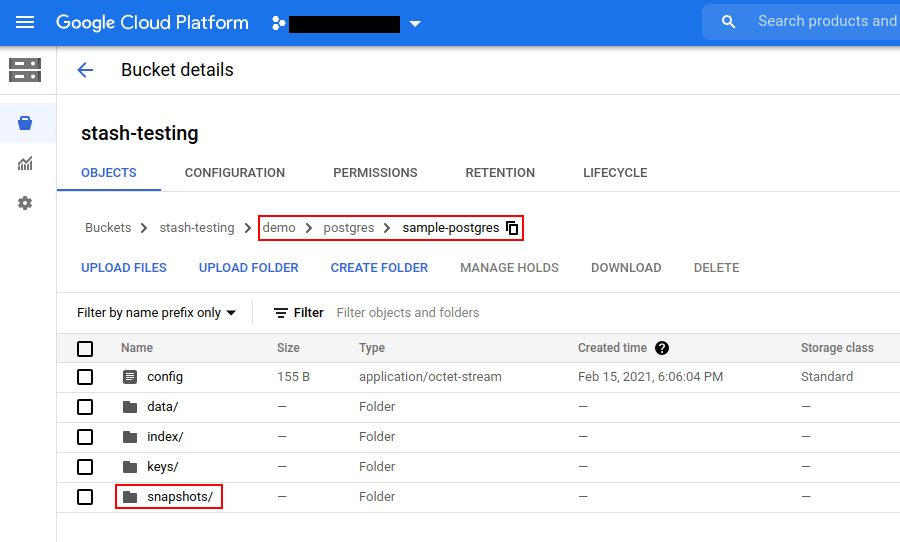
Now, if we navigate to the GCS bucket, we are going to see backed up data has been stored in demo/postgres/sample-postgres directory as specified by spec.backend.gcs.prefix field of Repository crd.
Note: Stash keeps all the backed-up data encrypted. So, data in the backend will not make any sense until they are decrypted.
Restore PostgreSQL
Now, we are going to restore the database from the backup we have taken in the previous section. We are going to deploy a new database and initialize it from the backup.
Stop Taking Backup of the Old Database:
At first, let’s stop taking any further backup of the old database so that no backup is taken during the restore process. We are going to pause the BackupConfiguration crd that we had created to backup the sample-postgres database. Then, Stash will stop taking any further backup for this database.
Let’s pause the sample-postgres-backup BackupConfiguration,
❯ kubectl patch backupconfiguration -n demo sample-postgres-backup --type="merge" --patch='{"spec": {"paused": true}}'
backupconfiguration.stash.appscode.com/sample-postgres-backup patched
Now, wait for a moment. Stash will pause the BackupConfiguration. Verify that the BackupConfiguration has been paused,
❯ kubectl get backupconfiguration -n demo sample-postgres-backup
NAME                    TASK                        SCHEDULE      PAUSED   PHASE   AGE
sample-postgres-backup  postgres-backup-11.9      */5 * * * *     true     Ready   5m55s
Notice the PAUSED column. Value true for this field means that the BackupConfiguration has been paused.
Deploy Restored Database:
Now, we are going to deploy the restored database similarly as we have deployed the original sample-psotgres database.
Below is the YAML for Postgres crd we are going deploy to initialize from backup,
apiVersion: kubedb.com/v1alpha2
kind: Postgres
metadata:
  name: restored-postgres
  namespace: demo
spec:
  version: "11.11"
  storageType: Durable
  storage:
    storageClassName: "standard"
    accessModes:
    - ReadWriteOnce
    resources:
      requests:
        storage: 1Gi
  init:
    waitForInitialRestore: true
  terminationPolicy: Delete
Notice the init section. Here, we have specified waitForInitialRestore: true which tells KubeDB to wait for the first restore to complete before marking this database as ready to use.
Let’s create the above database,
$ kubectl apply -f https://github.com/stashed/docs/raw/v2023.03.20/docs/addons/postgres/standalone/examples/restored-postgres.yaml
postgres.kubedb.com/restored-postgres created
This time, the database will get stuck in the Provisioning state because we haven’t restored the data yet.
❯ kubectl get postgres -n demo restored-postgres
NAME                VERSION   STATUS         AGE
restored-postgres   11.2-v1   Provisioning   6m7s
You can check the log from the database pod to be sure whether the database is ready to accept connections or not.
❯ kubectl logs -n demo restored-postgres-0
....
2021-02-15 12:36:31.087 UTC [19] LOG:  listening on IPv4 address "0.0.0.0", port 5432
2021-02-15 12:36:31.087 UTC [19] LOG:  listening on IPv6 address "::", port 5432
2021-02-15 12:36:31.094 UTC [19] LOG:  listening on Unix socket "/var/run/postgresql/.s.PGSQL.5432"
2021-02-15 12:36:31.121 UTC [50] LOG:  database system was shut down at 2021-02-15 12:36:31 UTC
2021-02-15 12:36:31.126 UTC [19] LOG:  database system is ready to accept connections
As you can see from the above log that the database is ready to accept connections. Now, we can start restoring this database.
Create RestoreSession:
Now, we need to create a RestoreSession object pointing to the AppBinding for this restored database.
Check AppBinding has been created for the restored-postgres database using the following command,
❯ kubectl get appbindings -n demo restored-postgres
NAME                TYPE                  VERSION   AGE
restored-postgres   kubedb.com/postgres   11.2-v1   6m45s
If you are not using KubeDB to deploy the database, then create the AppBinding manually.
Below is the YAML for the RestoreSession crd that we are going to create to restore backed up data into restored-postgres database.
apiVersion: stash.appscode.com/v1beta1
kind: RestoreSession
metadata:
  name: sample-postgres-restore
  namespace: demo
spec:
  task:
    name: postgres-restore-11.9
  repository:
    name: gcs-repo
  target:
    ref:
      apiVersion: appcatalog.appscode.com/v1alpha1
      kind: AppBinding
      name: restored-postgres
  rules:
  - snapshots: [latest]
Here,
spec.task.namespecifies the name of theTaskcrd that specifies the Functions and their execution order to restore a PostgreSQL database.spec.repository.namespecifies theRepositorycrd that holds the backend information where our backed up data has been stored.spec.target.refrefers to the AppBinding crd for therestored-postgresdatabase where the backed up data will be restored.spec.rulesspecifies that we are restoring from the latest backup snapshot of the original database.
Let’s create the RestoreSession crd we have shown above,
$ kubectl apply -f https://github.com/stashed/docs/raw/v2023.03.20/docs/addons/postgres/standalone/examples/restoresession.yaml
restoresession.stash.appscode.com/sample-postgres-restore created
Once, you have created the RestoreSession object, Stash will create a job to restore the database. We can watch the RestoreSession phase to check whether the restore process has succeeded or not.
Run the following command to watch RestoreSession phase,
❯ kubectl get restoresession -n demo -w
NAME                      REPOSITORY   PHASE     AGE
sample-postgres-restore   gcs-repo     Running   4s
sample-postgres-restore   gcs-repo     Running   15s
sample-postgres-restore   gcs-repo     Succeeded   15s
sample-postgres-restore   gcs-repo     Succeeded   15s
So, we can see from the output of the above command that the restore process succeeded.
Verify Restored Data:
In this section, we are going to verify that the desired data has been restored successfully. We are going to connect to the database and check whether the table we had created in the original database has been restored or not.
At first, check if the database has gone into Ready state using the following command,
❯ kubectl get pg -n demo restored-postgres
NAME                VERSION   STATUS   AGE
restored-postgres   11.2-v1   Ready    11m
Now, exec into the database pod and verify restored data.
❯ kubectl exec -it -n demo restored-postgres-0 -- /bin/sh
# login as "postgres" superuser.
/ # psql -U postgres
psql (11.2)
Type "help" for help.

# verify that the "demo" database has been restored
postgres=# \l
                                 List of databases
   Name    |  Owner   | Encoding |  Collate   |   Ctype    |   Access privileges
-----------+----------+----------+------------+------------+-----------------------
 demo      | postgres | UTF8     | en_US.utf8 | en_US.utf8 |
 postgres  | postgres | UTF8     | en_US.utf8 | en_US.utf8 |
 template0 | postgres | UTF8     | en_US.utf8 | en_US.utf8 | =c/postgres          +
           |          |          |            |            | postgres=CTc/postgres
 template1 | postgres | UTF8     | en_US.utf8 | en_US.utf8 | =c/postgres          +
           |          |          |            |            | postgres=CTc/postgres
(4 rows)

# connect to the "demo" database
postgres=# \c demo
You are now connected to database "demo" as user "postgres".

# verify that the sample table has been restored
demo=# \d
          List of relations
 Schema |  Name   | Type  |  Owner
--------+---------+-------+----------
 public | company | table | postgres
(1 row)

# disconnect from the database
demo=# \q

# exit from the pod
/ # exit
So, from the above output, we can see the demo database we had created in the original database sample-postgres has been restored in the restored-postgres database.
Cleanup
To cleanup the Kubernetes resources created by this tutorial, run:
kubectl delete -n demo backupconfiguration sample-postgres-backup
kubectl delete -n demo restoresession sample-postgres-restore
kubectl delete -n demo postgres sample-postgres restored-postgres
kubectl delete -n demo repository gcs-repo