


You are looking at the documentation of a prior release. To read the documentation of the latest release, please
visit here.
Define Cluster Wide Backup Policy using Stash Auto-backup
This guide will show you how you can define cluster wide backup policy using Stash Auto-backup. Here, we are going to define a backup policy for MySQL databases. Then, we will demonstrate how users from different namespaces can use that policy to backup their own MySQL instances.
Before You Begin
At first, you need to have a Kubernetes cluster, and the
kubectlcommand-line tool must be configured to communicate with your cluster. If you do not already have a cluster, you can create one by using kind.Install
Stashin your cluster following the steps here.You should be familiar with the following
Stashconcepts:
We are going to take backup from the prod-1, prod-2 and prod-3 namespaces. We want to create our backup resources in backup namespace.
Let’s create the above mentioned namespaces,
$ kubectl create ns prod-1
namespace/prod-1 created

$ kubectl create ns prod-2
namespace/prod-2 created

$ kubectl create ns prod-3
namespace/prod-3 created

$ kubectl create ns backup
namespace/backup created
Note: YAML files used in this tutorial can be found here.
Prepare Backup Blueprint
Stash allows defining a backup template using BackupBlueprint CR. In this section, we are going to configure a BackupBlueprint for taking backup of MySQL databases.
Prepare Backend
We are going to use GCS Backend to store the backed up data. You can use any supported backend you prefer. You just have to configure Storage Secret and spec.backend section of BackupBlueprint to match your backend. To learn which backends are supported by Stash and how to configure them, please visit here.
For GCS backend, if the bucket does not exist, Stash needs
Storage Object Adminrole permissions to create the bucket. For more details, please check the following guide.
Create Storage Secret:
At first, let’s create a Storage Secret for the GCS backend in the backup namespace,
$ echo -n 'changeit' > RESTIC_PASSWORD
$ echo -n '<your-project-id>' > GOOGLE_PROJECT_ID
$ mv downloaded-sa-json.key GOOGLE_SERVICE_ACCOUNT_JSON_KEY
$ kubectl create secret generic -n backup gcs-secret \
    --from-file=./RESTIC_PASSWORD \
    --from-file=./GOOGLE_PROJECT_ID \
    --from-file=./GOOGLE_SERVICE_ACCOUNT_JSON_KEY
secret/gcs-secret created
Prepare RBAC
Stash does not grant necessary RBAC permissions to the backup job for taking backup from a different namespace. In this case, we have to provide the RBAC permissions manually. This helps to prevent unauthorized namespaces from getting access to a database via Stash.
Create ServiceAccount:
At first, we are going to create a ServiceAccount in the backup namespace. We will grant necessary RBAC permissions to this ServiceAccount and use it in the backup job. Here is the YAML of the ServiceAccount,
apiVersion: v1
kind: ServiceAccount
metadata:
  name: cross-namespace-target-reader
  namespace: backup
Let’s create the ServiceAccount,
$ kubectl apply -f https://github.com/stashed/docs/raw/v2023.05.31/docs/guides/managed-backup/dedicated-backup-namespace-auto-backup/examples/serviceaccount.yaml
serviceaccount/cross-namespace-target-reader created
Create ClusterRole and ClusterRoleBinding
We are going to create a ClusterRole and ClusterRoleBinding with the necessary permissions to perform the backup. Here are the YAMLs of the ClusterRole and ClusterRoleBinding,
apiVersion: rbac.authorization.k8s.io/v1
kind: ClusterRole
metadata:
  name: cross-namespace-target-reader
rules:
- apiGroups: [""]
  resources: ["secrets","pods","endpoints"]
  verbs: ["get","list"]
- apiGroups: ["appcatalog.appscode.com"]
  resources: ["appbindings"]
  verbs: ["get","list"]
---
apiVersion: rbac.authorization.k8s.io/v1
kind: ClusterRoleBinding
metadata:
  name: cross-namespace-target-reader
subjects:
- kind: ServiceAccount
  name: cross-namespace-target-reader
  namespace: backup
roleRef:
  kind: ClusterRole
  name: cross-namespace-target-reader
  apiGroup: rbac.authorization.k8s.io
Let’s create the ClusterRole and ClusterRoleBinding we have shown above,
$ kubectl apply -f https://github.com/stashed/docs/raw/v2023.05.31/docs/guides/managed-backup/dedicated-backup-namespace-auto-backup/examples/clusterrole_clusterrolebinding.yaml
clusterrole.rbac.authorization.k8s.io/cross-namespace-target-reader created
clusterrolebinding.rbac.authorization.k8s.io/cross-namespace-target-reader created
The above RBAC permissions will allow the ServiceAccounts to perform backup of targets from any namespace.
Alternatively, you can create Role and RoleBinding with the same permissions in case you want to restrict the ServiceAccounts to backup targets from only a specific namespace.
Create BackupBlueprint
Now, we have to create a BackupBlueprint crd with a blueprint for Repository and BackupConfiguration object.
Below is the YAML of the BackupBlueprint object that we are going to create,
apiVersion: stash.appscode.com/v1beta1
kind: BackupBlueprint
metadata:
  name: mysql-backup
spec:
  backupNamespace: backup
  # ============== Blueprint for Repository ==========================
  backend:
    gcs:
      bucket: stash-testing
      prefix: stash-backup/${TARGET_NAMESPACE}/${TARGET_NAME}
    storageSecretName: gcs-secret
  # ============== Blueprint for BackupConfiguration =================
  schedule: "*/5 * * * *"
  retentionPolicy:
    name: 'keep-last-5'
    keepLast: 5
    prune: true
  runtimeSettings:
    pod:
      serviceAccountName: cross-namespace-target-reader
Here,
spec.backupNamespacerefers to the namepspace where the backup resources will be created.spec.runtimeSettings.pod.serviceAccountNamerefers to the name of theServiceAccountto use in the backup pod.
Note that we have used some variables (format: ${<variable name>}) in spec.backend.gcs.prefix field. Stash will substitute these variables with values from the respective target. Since the resolved prefix will be different for different target, the backed up data will be stored in different directory inside the bucket. To know which variable you can use in this prefix field, please visit here.
Let’s create the BackupBlueprint that we have shown above,
kubectl apply -f https://github.com/stashed/docs/raw/v2023.05.31/docs/guides/managed-backup/dedicated-backup-namespace-auto-backup/examples/backupblueprint.yaml
backupblueprint.stash.appscode.com/mysql-backup created
Now, automatic backup is configured for MySQL database. We just have to add some annotations to the targeted databases to enable periodic backup.
Backup
In this section, we are going to backup three MySQL databases from the prod-1, prod-2, and prod-3 namespaces.
Deploy MySQL Databases
We are going to use KubeDB for deploying sample MySQL Databases. Let’s deploy three different MySQL databases in prod-1, prod-2, and prod-3 namespaces,
apiVersion: kubedb.com/v1alpha2
kind: MySQL
metadata:
  name: sample-mysql-1
  namespace: prod-1
  annotations:
    stash.appscode.com/backup-blueprint: mysql-backup
spec:
  version: "8.0.27"
  replicas: 1
  storageType: Durable
  storage:
    accessModes:
      - ReadWriteOnce
    resources:
      requests:
        storage: 50Mi
  terminationPolicy: WipeOut
---
apiVersion: kubedb.com/v1alpha2
kind: MySQL
metadata:
  name: sample-mysql-2
  namespace: prod-2
  annotations:
    stash.appscode.com/backup-blueprint: mysql-backup
spec:
  version: "8.0.27"
  replicas: 1
  storageType: Durable
  storage:
    accessModes:
      - ReadWriteOnce
    resources:
      requests:
        storage: 50Mi
  terminationPolicy: WipeOut
---
apiVersion: kubedb.com/v1alpha2
kind: MySQL
metadata:
  name: sample-mysql-3
  namespace: prod-3
  annotations:
    stash.appscode.com/backup-blueprint: mysql-backup
spec:
  version: "8.0.27"
  replicas: 1
  storageType: Durable
  storage:
    accessModes:
      - ReadWriteOnce
    resources:
      requests:
        storage: 50Mi
  terminationPolicy: WipeOut
Notice the metadata.annotations field. We have specified to use mysql-backup BackupBlueprint for creating Repository and BackupConfiguration for the MySQL databases. BackupBlueprint is a non-namespaced resource, so we just need to specify the name of the blueprint.
Let’s create the above MySQL objects,
$ kubectl apply -f https://github.com/stashed/docs/raw/v2023.05.31/docs/guides/managed-backup/dedicated-backup-namespace-auto-backup/examples/mysql.yaml
mysql.kubedb.com/sample-mysql-1 created
mysql.kubedb.com/sample-mysql-2 created
mysql.kubedb.com/sample-mysql-3 created
If everything goes well, Stash will create a Repository and a BackupConfiguration for each MySQL database with the name in the following format:
<Target Namespace>-<Target Kind>-<Target Name>
Verify Repository:
Verify that the Repositories has been created successfully by the following command,
$ kubectl get repository -n backup
NAME                        INTEGRITY   SIZE   SNAPSHOT-COUNT   LAST-SUCCESSFUL-BACKUP   AGE
prod-1-app-sample-mysql-1                                                                31s
prod-2-app-sample-mysql-2                                                                31s
prod-3-app-sample-mysql-3                                                                30s
Verify BackupConfiguratoin:
If everything goes well, Stash should create a BackupConfiguration for each of the MySQL database and the phase of the BackupConfiguration should be Ready. Verify that the BackupConfigurations have been created by the following command,
$ kubectl get backupconfiguration -n backup
NAME                        TASK   SCHEDULE      PAUSED   PHASE   AGE
prod-1-app-sample-mysql-1          */5 * * * *            Ready   11m
prod-2-app-sample-mysql-2          */5 * * * *            Ready   11m
prod-3-app-sample-mysql-3          */5 * * * *            Ready   11m
Let’s check the YAML of one of these BackupConfigurations,
$ kubectl get backupconfiguration -n backup prod-1-app-sample-mysql-1 -o yaml
apiVersion: stash.appscode.com/v1beta1
kind: BackupConfiguration
metadata:
  name: prod-1-app-sample-mysql-1
  namespace: backup
  ...
spec:
  driver: Restic
  repository:
    name: prod-1-app-sample-mysql-1
    namespace: backup
  retentionPolicy:
    keepLast: 5
    name: keep-last-5
    prune: true
  runtimeSettings:
    pod:
      serviceAccountName: cross-namespace-target-reader
  schedule: '*/5 * * * *'
  target:
    ref:
      apiVersion: appcatalog.appscode.com/v1alpha1
      kind: AppBinding
      name: sample-mysql-1
      namespace: prod-1
  task: {}
  tempDir: {}
Notice that the spec.target.ref is pointing to the AppBinding of the database sample-mysql-1 in the prod-1 namespace.
Wait for BackupSession:
Run the following command to watch BackupSession crd:
$ watch -n 1 kubectl get backupsession -n backup
NAME                                   INVOKER-TYPE          INVOKER-NAME                PHASE       DURATION   AGE
prod-1-app-sample-mysql-1-1650885602   BackupConfiguration   prod-1-app-sample-mysql-1   Succeeded   45s        5m25s
prod-1-app-sample-mysql-1-1650885906   BackupConfiguration   prod-1-app-sample-mysql-1   Running                21s
prod-2-app-sample-mysql-2-1650885310   BackupConfiguration   prod-2-app-sample-mysql-2   Succeeded   40s        10m
prod-2-app-sample-mysql-2-1650885602   BackupConfiguration   prod-2-app-sample-mysql-2   Succeeded   41s        5m25s
prod-2-app-sample-mysql-2-1650885906   BackupConfiguration   prod-2-app-sample-mysql-2   Running                21s
prod-3-app-sample-mysql-3-1650885310   BackupConfiguration   prod-3-app-sample-mysql-3   Succeeded   38s        10m
prod-3-app-sample-mysql-3-1650885602   BackupConfiguration   prod-3-app-sample-mysql-3   Succeeded   41s        5m25s
Here, the phase Succeeded means that the backup process has been completed successfully.
Verify Backup:
When backup session is completed, Stash will update the respective Repository to reflect the latest state of backed up data.
Run the following command to check if the snapshots are stored in the backend,
$ kubectl get repository -n backup
NAME                        INTEGRITY   SIZE        SNAPSHOT-COUNT   LAST-SUCCESSFUL-BACKUP   AGE
prod-1-app-sample-mysql-1   true        4.174 MiB   5                2m50s                    50m
prod-2-app-sample-mysql-2   true        7.283 MiB   5                2m50s                    50m
prod-3-app-sample-mysql-3   true        4.701 MiB   5                2m50s                    50m
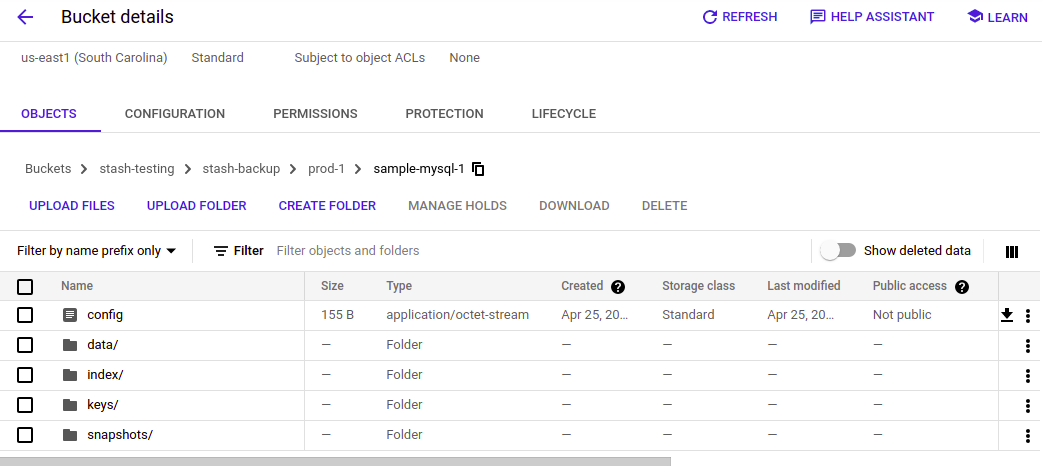
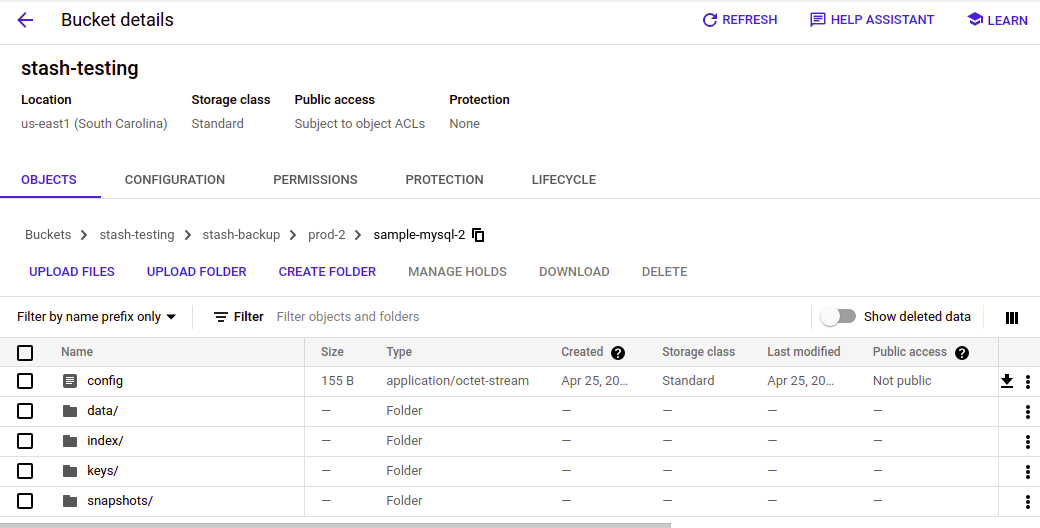
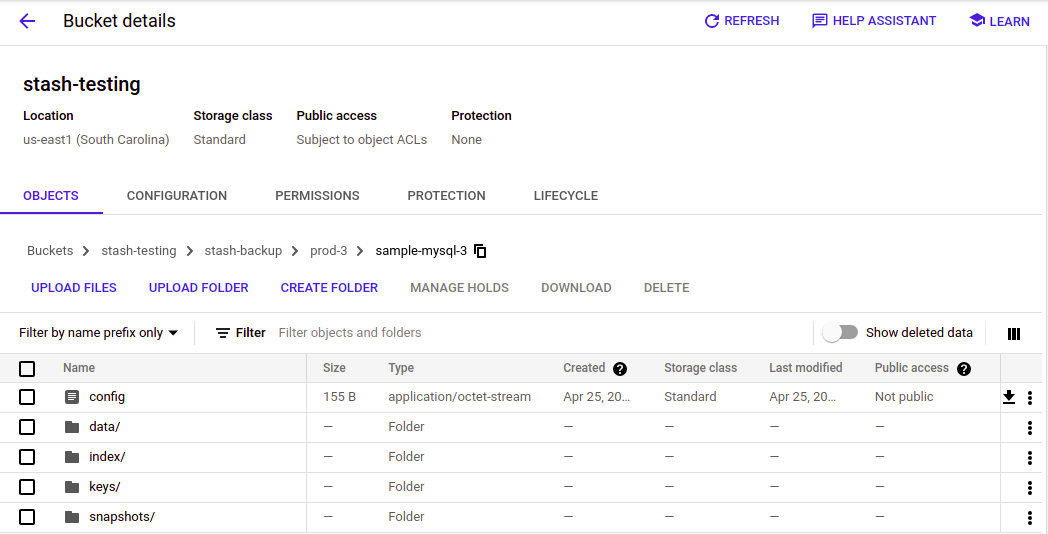
If we navigate to stash-backup/prod-1/sample-mysql-1, stash-backup/prod-2/sample-mysql-2, and stash-backup/prod-3/sample-mysql-3 directories of our GCS bucket, we are going to see that the snapshots of the databases sample-mysql-1, sample-mysql-2 andsample-mysql-3 have been stored there respectively.
Cleanup
To cleanup the Kubernetes resources created by this tutorial, run:
$ kubectl delete backupblueprint mysql-backup
backupblueprint.stash.appscode.com "mysql-backup" deleted
$ kubectl delete backupconfiguration -n backup --all
backupconfiguration.stash.appscode.com "prod-1-app-sample-mysql-1" deleted
backupconfiguration.stash.appscode.com "prod-2-app-sample-mysql-2" deleted
backupconfiguration.stash.appscode.com "prod-3-app-sample-mysql-3" deleted
$ kubectl delete repository -n backup --all
repository.stash.appscode.com "prod-1-app-sample-mysql-1" deleted
repository.stash.appscode.com "prod-2-app-sample-mysql-2" deleted
repository.stash.appscode.com "prod-3-app-sample-mysql-3" deleted
$ kubectl delete secret -n backup gcs-secret
secret "gcs-secret" deleted
$ kubectl delete sa -n backup cross-namespace-target-reader
serviceaccount "mysql-sa" deleted
$ kubectl delete clusterrole cross-namespace-target-reader
role.rbac.authorization.k8s.io "mysql-role" deleted
$ kubectl delete clusterrolebinding cross-namespace-target-reader
rolebinding.rbac.authorization.k8s.io "mysql-rolebinding" deleted
$ kubectl delete my -n prod-1 sample-mysql-1
mysql.kubedb.com "sample-mysql-1" deleted
$ kubectl delete my -n prod-2 sample-mysql-2
mysql.kubedb.com "sample-mysql-2" deleted
$ kubectl delete my -n prod-3 sample-mysql-3
mysql.kubedb.com "sample-mysql-3" deleted