


You are looking at the documentation of a prior release. To read the documentation of the latest release, please
visit here.
Using Kube2iam with Stash on Amazon EKS
This guide will show you how to use Kube2iam of Amazon Elastic Kubernetes Service (Amazon EKS) with Stash. Here, we are going to backup a MariaDB database and store the backed up data into a AWS S3 bucket.Then, we are going to show how to restore this backed up data.
Before You Begin
- At first, you need to have an EKS cluster. If you don’t already have a cluster, create one from here.
- Install
Stashin your cluster following the steps here. - Install
KubeDBoperator in your cluster following the steps here. - Install Kube2iam in your cluster.
- You should be familiar with the following
Stashconcepts: - You will need a AWS S3 Bucket to store the backup snapshots.
- Install
eksctlfollowing the steps here.
To keep everything isolated, we are going to use a separate namespace called demo throughout this tutorial.
$ kubectl create ns demo
namespace/demo created
Setting up the Roles and Policies in AWS
Create IAM Policy
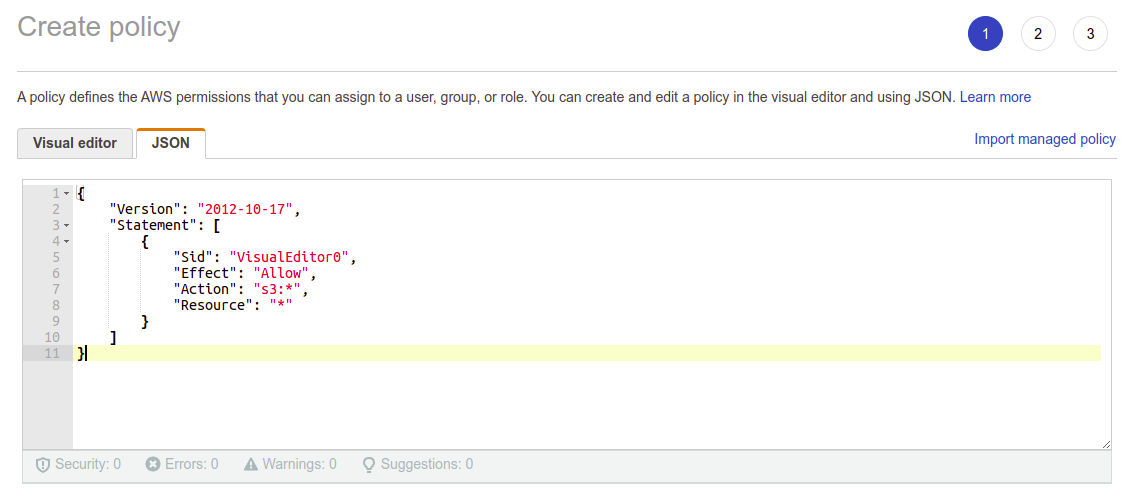
We need an IAM policy for accessing S3 buckets. Below is the JSONof the IAM policy we are going to create,
{
    "Version": "2012-10-17",
    "Statement": [
        {
            "Sid": "VisualEditor0",
            "Effect": "Allow",
            "Action": "s3:*",
            "Resource": "*"
        }
    ]
}
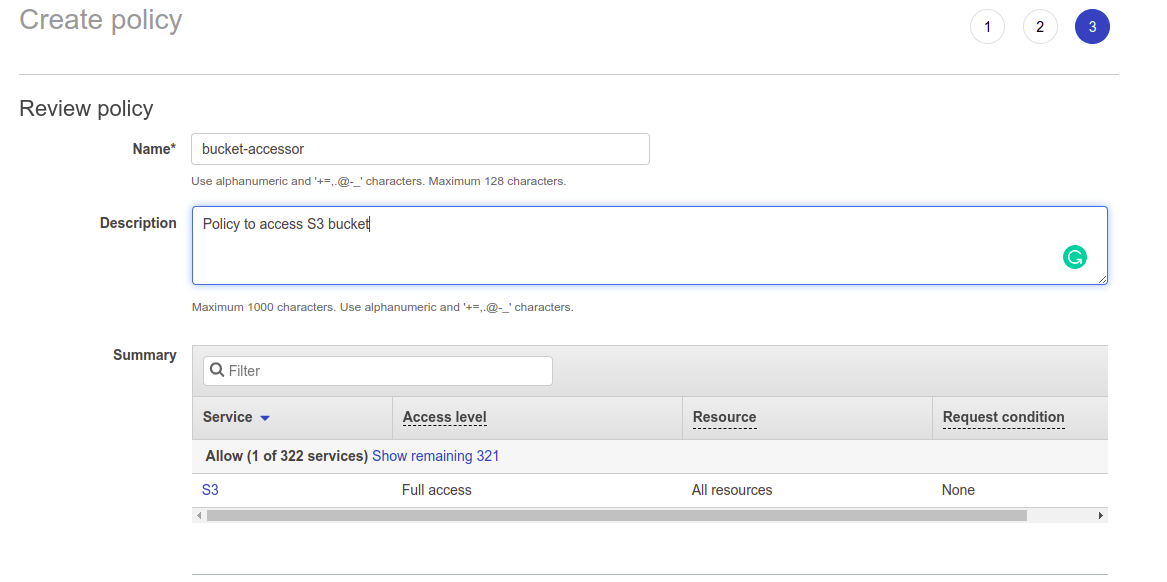
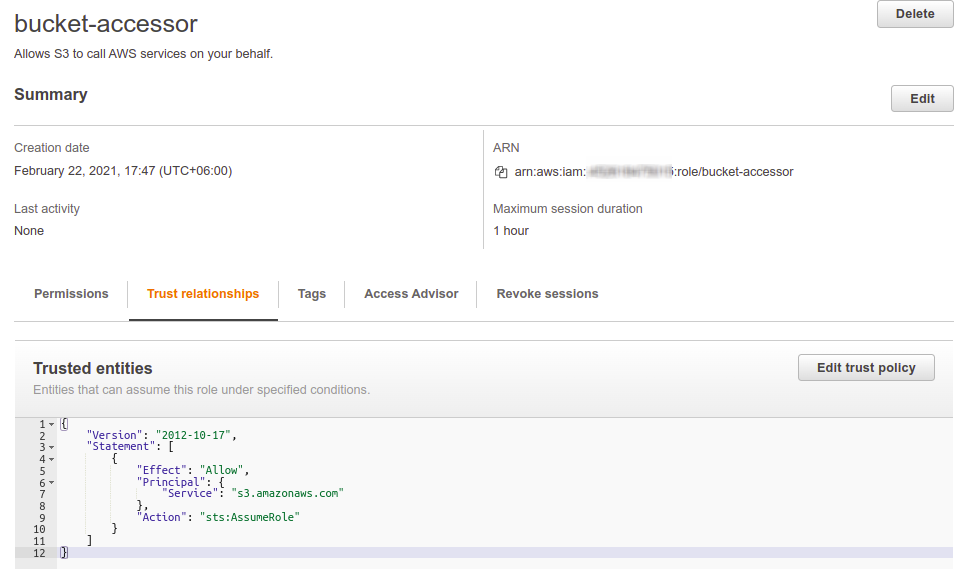
Let’s navigate to the IAM management console to create a policy bucket-accessor with full access permission to S3 buckets.
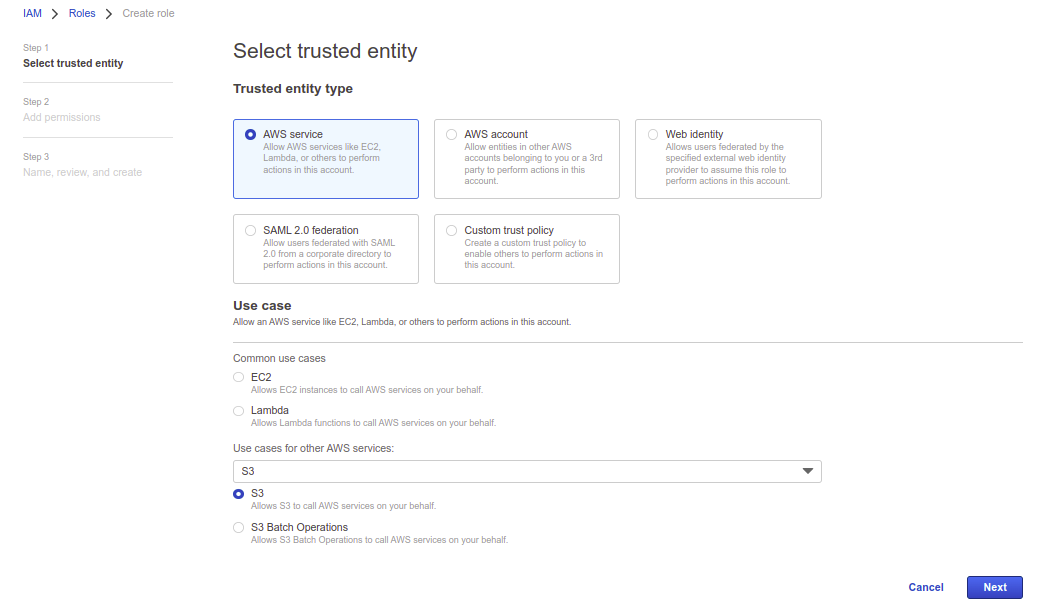
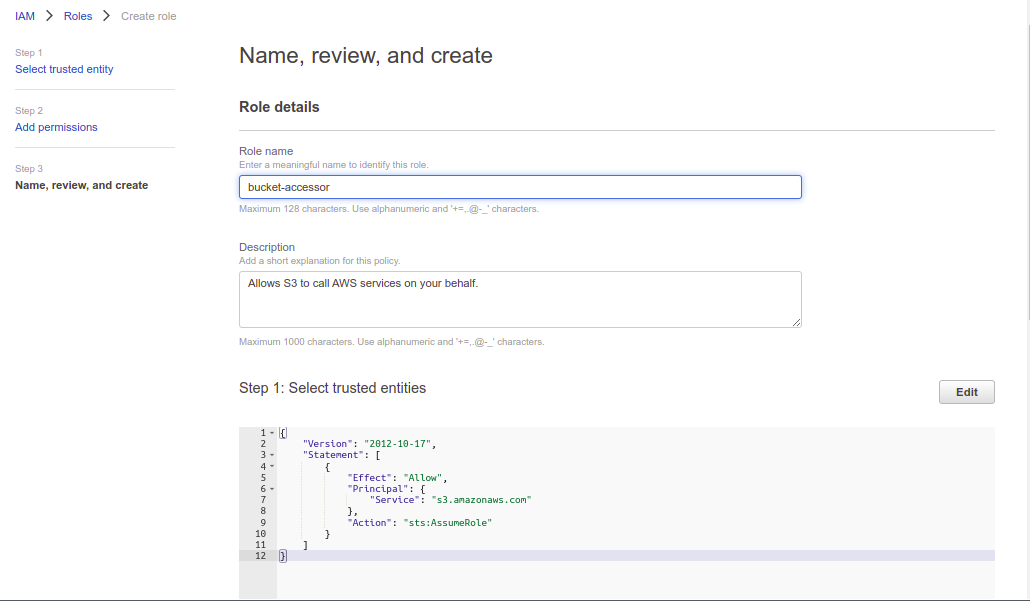
Create Role
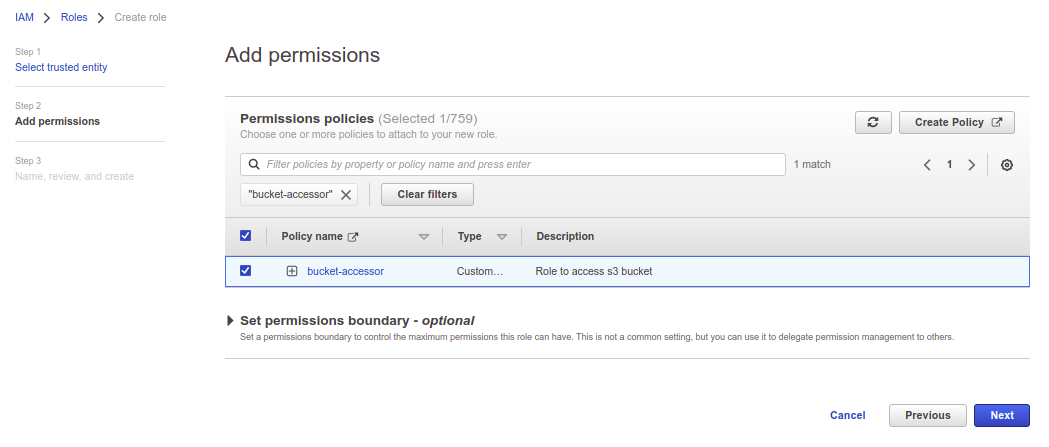
Now, let’s create an IAM role bucket-accessor attaching the above IAM policy,
Configure Roles
We need to add the policy to allow our Kubernete worker nodes to assume roles that are not in their default role. We are going to create a new IAM policy assume-policy and attach it with the existing node role so that it can assume the role for accessing the bucket. Below is the JSON of the IAM policy we are going to create,
{
  "Version": "2012-10-17",
  "Statement": [
    {
      "Action": [
        "sts:AssumeRole"
      ],
      "Effect": "Allow",
      "Resource": "arn:aws:iam::123456789012:role/bucket-accessor"
    }
  ]
}
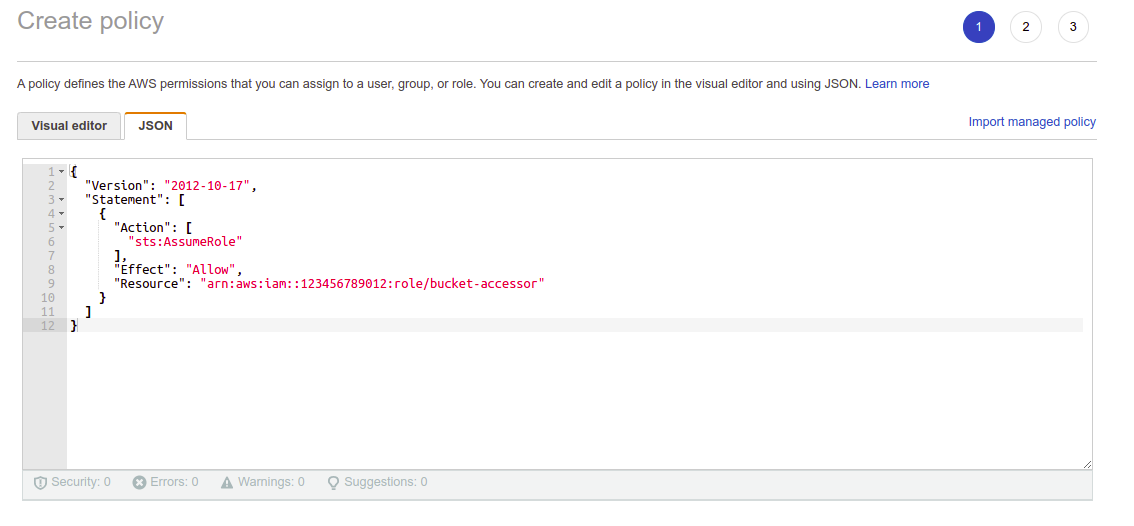
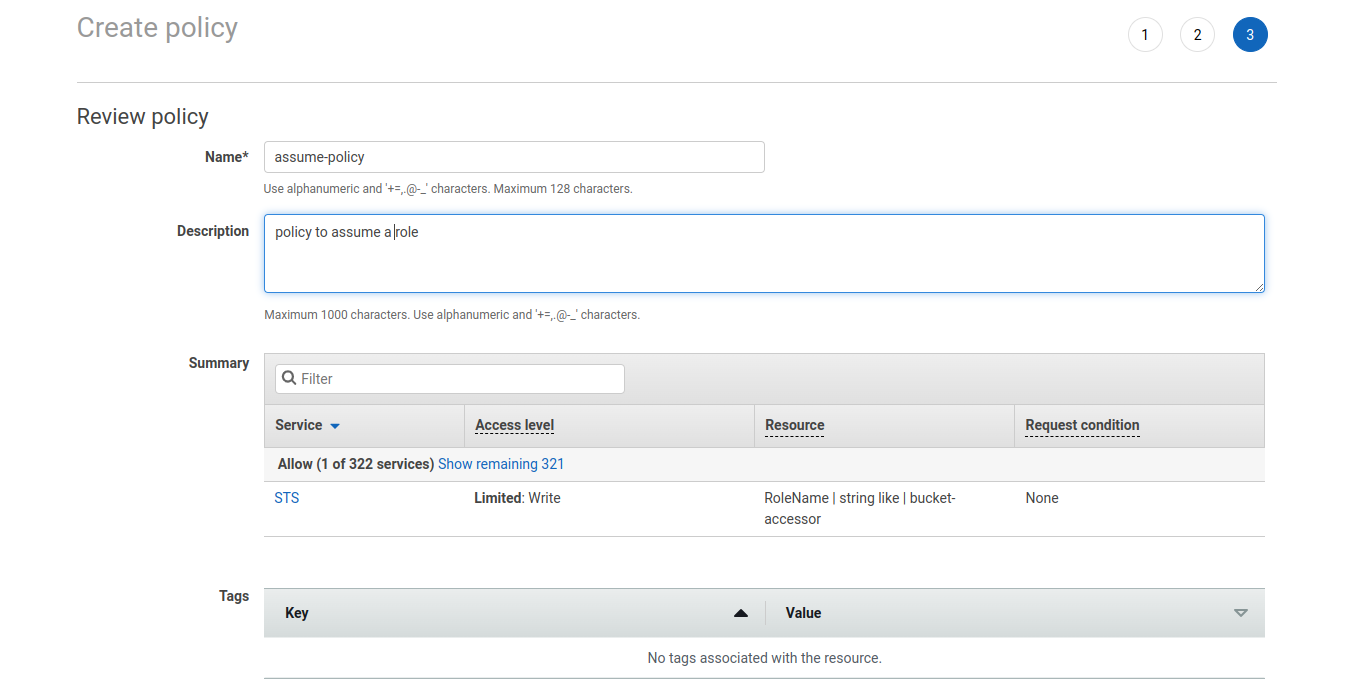
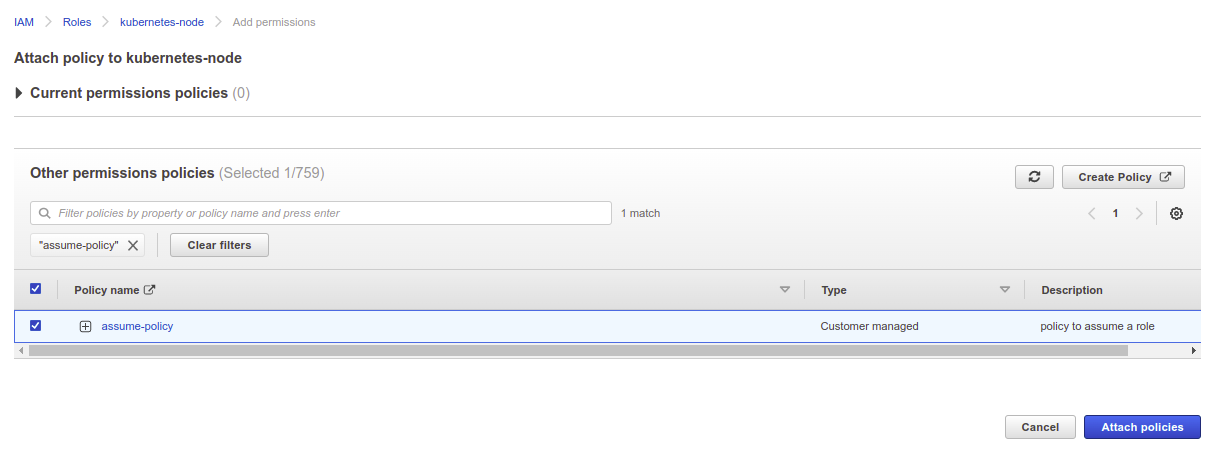
Let’s navigate to the IAM management console to create assume-policy,
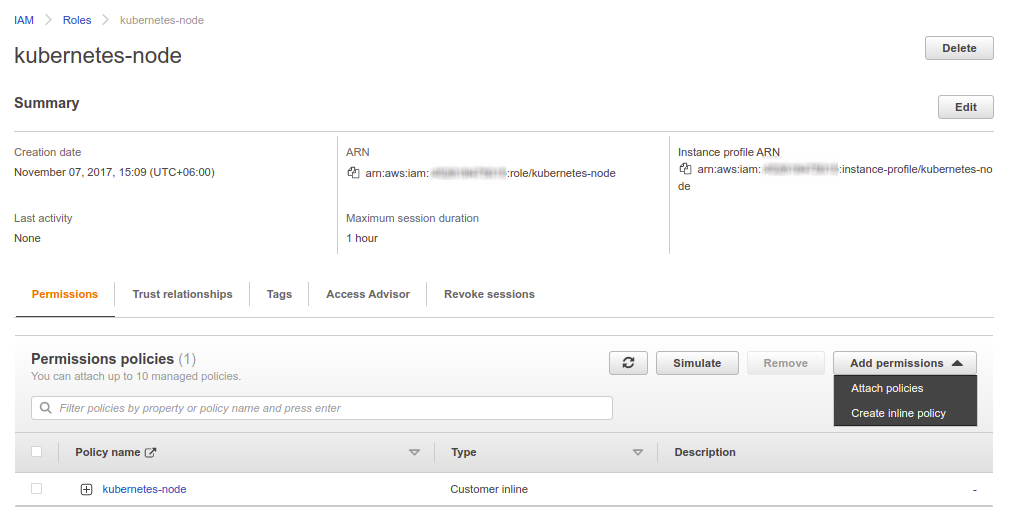
Now, let’s attach the IAM policy to our exisiting node role,
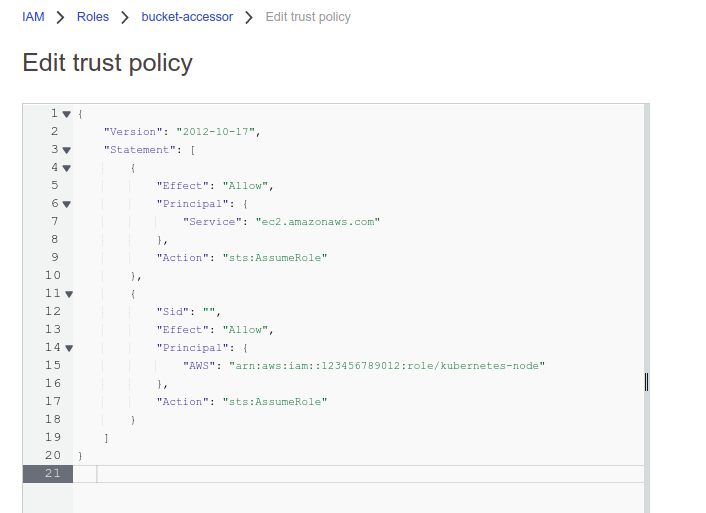
The bucket-accessor role needs the trust policy to trust the node role. Below is the JSON of the trust policy we are going to use,
{
    "Version": "2012-10-17",
    "Statement": [
        {
            "Effect": "Allow",
            "Principal": {
                "Service": "ec2.amazonaws.com"
            },
            "Action": "sts:AssumeRole"
        },
        {
            "Sid": "",
            "Effect": "Allow",
            "Principal": {
                "AWS": "arn:aws:iam::123456789012:role/kubernetes-node"
            },
            "Action": "sts:AssumeRole"
        }
    ]
}
Lets update the trust policy of bucket-accessor role,
Prepare MariaDB
In this section, we are going to deploy a MariaDB database using KubeDB. Then, we are going to insert some sample data into it.
Deploy MariaDB using KubeDB
At first, let’s deploy a MariaDB standalone database named sample-mariadb using KubeDB,
apiVersion: kubedb.com/v1alpha2
kind: MariaDB
metadata:
  name: sample-mariadb
  namespace: demo
spec:
  version: "10.5.8"
  replicas: 1
  storageType: Durable
  storage:
    storageClassName: "gp2"
    accessModes:
    - ReadWriteOnce
    resources:
      requests:
        storage: 1Gi
  terminationPolicy: WipeOut
$ kubectl apply -f https://github.com/stashed/docs/raw/v2022.09.29/docs/guides/platforms/eks-kube2iam/examples/mariadb.yaml
mariadb.kubedb.com/sample-mariadb created
Now, wait for the database pod sample-mariadb-0 to go into Running state,
$ kubectl get pod -n demo sample-mariadb-0
NAME               READY   STATUS    RESTARTS   AGE
sample-mariadb-0   1/1     Running   0          29m
Once the database pod is in Running state, verify that the database is ready to accept the connections.
$ kubectl logs -n demo sample-mariadb-0
2021-02-22  9:41:37 0 [Note] Reading of all Master_info entries succeeded
2021-02-22  9:41:37 0 [Note] Added new Master_info '' to hash table
2021-02-22  9:41:37 0 [Note] mysqld: ready for connections.
Version: '10.5.8-MariaDB-1:10.5.8+maria~focal'  socket: '/run/mysqld/mysqld.sock'  port: 3306  mariadb.org binary distribution
From the above log, we can see the database is ready to accept connections.
Insert Sample Data
Now, we are going to exec into the database pod and create some sample data. The sample-mariadb object creates a secret containing the credentials of MariaDB and set them as pod’s Environment varibles MYSQL_ROOT_USERNAME and MYSQL_ROOT_PASSWORD.
Here, we are going to use the root user (MYSQL_ROOT_USERNAME) credential MYSQL_ROOT_PASSWORD to insert the sample data. Let’s exec into the database pod and insert some sample data,
$ kubectl exec -it -n demo sample-mariadb-0 -- bash
root@sample-mariadb-0:/ mysql -u${MYSQL_ROOT_USERNAME} -p${MYSQL_ROOT_PASSWORD}
Welcome to the MariaDB monitor.  Commands end with ; or \g.
Your MariaDB connection id is 341
Server version: 10.5.8-MariaDB-1:10.5.8+maria~focal mariadb.org binary distribution

Copyright (c) 2000, 2018, Oracle, MariaDB Corporation Ab and others.

Type 'help;' or '\h' for help. Type '\c' to clear the current input statement.

# Let's create a database named "company"
MariaDB [(none)]>  create database company;
Query OK, 1 row affected (0.000 sec)

# Verify that the database has been created successfully
MariaDB [(none)]> show databases;
+--------------------+
| Database           |
+--------------------+
| company            |
| information_schema |
| mysql              |
| performance_schema |
+--------------------+
4 rows in set (0.001 sec)

# Now, let's create a table called "employee" in the "company" table
MariaDB [(none)]> create table company.employees ( name varchar(50), salary int);
Query OK, 0 rows affected (0.018 sec)

# Verify that the table has been created successfully
MariaDB [(none)]> show tables in company;
+-------------------+
| Tables_in_company |
+-------------------+
| employees         |
+-------------------+
1 row in set (0.007 sec)

# Now, let's insert a sample row in the table
MariaDB [(none)]> insert into company.employees values ('John Doe', 5000);
Query OK, 1 row affected (0.003 sec)

# Insert another sample row
MariaDB [(none)]> insert into company.employees values ('James William', 7000);
Query OK, 1 row affected (0.002 sec)

# Verify that the rows have been inserted into the table successfully
MariaDB [(none)]>  select * from company.employees;
+---------------+--------+
| name          | salary |
+---------------+--------+
| John Doe      |   5000 |
| James William |   7000 |
+---------------+--------+
2 rows in set (0.001 sec)

MariaDB [(none)]> exit
Bye
We have successfully deployed a MariaDB database and inserted some sample data into it.
Prepare Backup
In this section, we are going to prepare the necessary resources (i.e. database connection information, backend information, etc.) before backup.
Verify Stash MariaDB Addon Installed
When you install the Stash Enterprise edition, it automatically installs all the official database addons. Verify that it has installed the MariaDB addons using the following command.
$ kubectl get tasks.stash.appscode.com | grep mariadb
mariadb-backup-10.5.8    35s
mariadb-restore-10.5.8   35s
Ensure AppBinding
Stash needs to know how to connect with the database. An AppBinding exactly provides this information. It holds the Service and Secret information of the database. You have to point to the respective AppBinding as a target of backup instead of the database itself.
Stash expect your database Secret to have username and password keys. If your database secret does not have them, the AppBinding can also help here. You can specify a secretTransforms section with the mapping between the current keys and the desired keys.
You don’t need to worry about appbindings if you are using KubeDB. It creates an appbinding containing the necessary informations when you deploy the database. Let’s ensure the appbinding create by KubeDB operator.
$ kubectl get appbinding -n demo
NAME             TYPE                 VERSION   AGE
sample-mariadb   kubedb.com/mariadb   10.5.8      62m
We have a appbinding named same as database name sample-mariadb. We will use this later for connecting into this database.
Prepare Backend
We are going to store our backed up data into a S3 bucket. As we are using Kube2iam, we don’t need the AWS_ACCESS_KEY_ID and AWS_SECRET_ACCESS_KEY to access the S3 bucket.
At first, we need to create a secret with a Restic password. Then, we have to create a Repository crd that will hold the information about our backend storage.
Create Secret:
Let’s create a secret called encryption-secret with the Restic password,
$ echo -n 'changeit' > RESTIC_PASSWORD
$ kubectl create secret generic -n demo encryption-secret \
    --from-file=./RESTIC_PASSWORD \
secret "encryption-secret" created
Create Repository:
Now, let’s create a Repository with the information of our desired S3 bucket. Below is the YAML of Repository crd we are going to create,
apiVersion: stash.appscode.com/v1alpha1
kind: Repository
metadata:
  name: s3-repo
  namespace: demo
spec:
  backend:
    s3:
      endpoint: 's3.amazonaws.com'
      bucket: stash-qa
      region: us-east-1
      prefix: /demo/mariadb
    storageSecretName: encryption-secret
Let’s create the Repository we have shown above,
$ kubectl apply -f https://github.com/stashed/docs/raw/v2022.09.29/docs/guides/platforms/eks-kube2iam/examples/repository.yaml
repository.stash.appscode.com/gcs-repo created
Now, we are ready to backup our sample data into this backend.
Backup
To schedule a backup, we have to create a BackupConfiguration object targeting the respective AppBinding of our desired database. Then Stash will create a CronJob to periodically backup the database.
Create BackupConfiguration:
Below is the YAML for BackupConfiguration object we are going to use to backup the sample-mariadb database we have deployed earlier,
apiVersion: stash.appscode.com/v1beta1
kind: BackupConfiguration
metadata:
  name: sample-mariadb-backup
  namespace: demo
spec:
  runtimeSettings:
    pod:
      podAnnotations:
        iam.amazonaws.com/role: arn:aws:iam::452618475015:role/bucket-accessor
  schedule: "*/5 * * * *"
  repository:
    name: s3-repo
  target:
    ref:
      apiVersion: appcatalog.appscode.com/v1alpha1
      kind: AppBinding
      name: sample-mariadb
  retentionPolicy:
    name: keep-last-5
    keepLast: 5
    prune: true
Here,
spec.runtimeSettins.pod.podAnnotationsrefers to the annotations that will be attached with the respective pod.spec.repositoryrefers to theRepositoryobjectgcs-repothat holds backend GCS bucket information.spec.target.refrefers to the AppBinding object that holds the connection information of our targeted database.
Notice the
spec.runtimeSettings.podsection. We are now passing the respective IAM annotation viapodAnnotationsfield. Stash will pass this annotation to the respective backup pod.
Let’s create the BackupConfiguration crd we have shown above,
$ kubectl apply -f https://github.com/stashed/docs/raw/v2022.09.29/docs/guides/platforms/eks-kube2iam/examples/backupconfiguration.yaml
backupconfiguration.stash.appscode.com/sample-mariadb-backup created
Verify Backup Setup Successful:
If everything goes well, the phase of the BackupConfiguration should be Ready. The Ready phase indicates that the backup setup is successful. Let’s verify the Phase of the BackupConfiguration,
$ kubectl get backupconfiguration -n demo
NAME                    TASK                    SCHEDULE      PAUSED   PHASE      AGE
sample-mariadb-backup   mariadb-backup-10.5.8   */5 * * * *            Ready      11s
Verify CronJob:
Stash will create a CronJob with the schedule specified in spec.schedule field of BackupConfiguration object.
Verify that the CronJob has been created using the following command,
$ kubectl get cronjob -n demo
NAME                                 SCHEDULE      SUSPEND   ACTIVE   LAST SCHEDULE   AGE
stash-backup-sample-mariadb-backup   */5 * * * *   False     0        15s             17s
Wait for BackupSession:
The sample-mariadb-backup CronJob will trigger a backup on each scheduled slot by creating a BackupSession object.
Now, wait for a schedule to appear. Run the following command to watch for a BackupSession object,
$ kubectl get backupsession -n demo -w
NAME                               INVOKER-TYPE          INVOKER-NAME            PHASE     AGE
sample-mariadb-backup-1606994706   BackupConfiguration   sample-mariadb-backup   Running   24s
sample-mariadb-backup-1606994706   BackupConfiguration   sample-mariadb-backup   Running   75s
sample-mariadb-backup-1606994706   BackupConfiguration   sample-mariadb-backup   Succeeded   103s
Here, the phase Succeeded means that the backup process has been completed successfully.
Verify Backup:
Now, we are going to verify whether the backed up data is present in the backend or not. Once a backup is completed, Stash will update the respective Repository object to reflect the backup completion. Check that the repository gcs-repo has been updated by the following command,
$ kubectl get repository -n demo gcs-repo
NAME       INTEGRITY   SIZE        SNAPSHOT-COUNT   LAST-SUCCESSFUL-BACKUP   AGE
gcs-repo   true        1.327 MiB   1                60s                      8m
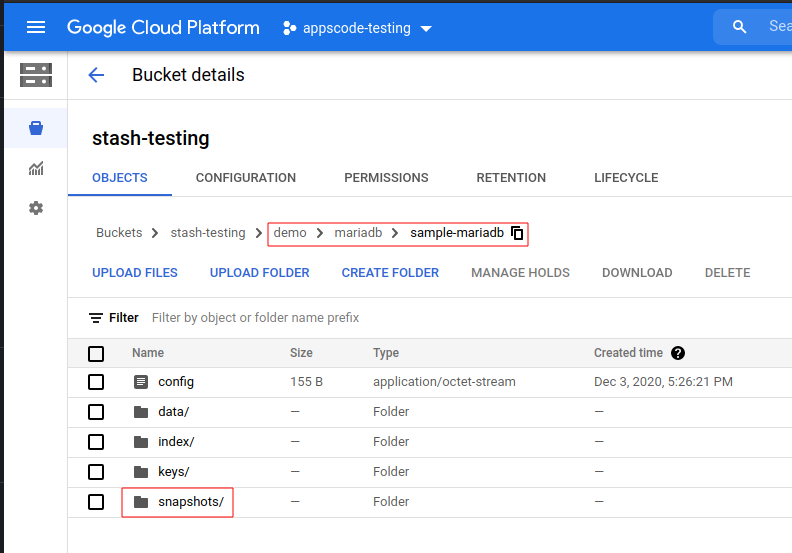
Now, if we navigate to the GCS bucket, we will see the backed up data has been stored in demo/mariadb/sample-mariadb directory as specified by .spec.backend.gcs.prefix field of the Repository object.
Note: Stash keeps all the backed up data encrypted. So, data in the backend will not make any sense until they are decrypted.
Restore
In this section, we are going to show you how to restore in the same database which may be necessary when you have accidentally deleted any data from the running database.
Temporarily Pause Backup:
At first, let’s stop taking any further backup of the database so that no backup runs after we delete the sample data. We are going to pause the BackupConfiguration object. Stash will stop taking any further backup when the BackupConfiguration is paused.
Let’s pause the sample-mariadb-backup BackupConfiguration,
$ kubectl patch backupconfiguration -n demo sample-mariadb-backup--type="merge" --patch='{"spec": {"paused": true}}'
backupconfiguration.stash.appscode.com/sample-mgo-rs-backup patched
Or you can use the Stash kubectl plugin to pause the BackupConfiguration,
$ kubectl stash pause backup -n demo --backupconfig=sample-mariadb-backup
BackupConfiguration demo/sample-mariadb-backup has been paused successfully.
Verify that the BackupConfiguration has been paused,
$ kubectl get backupconfiguration -n demo sample-mariadb-backup
NAME                   TASK                    SCHEDULE      PAUSED   PHASE   AGE
sample-mariadb-backup  mariadb-backup-10.5.8   */5 * * * *   true     Ready   26m
Notice the PAUSED column. Value true for this field means that the BackupConfiguration has been paused.
Stash will also suspend the respective CronJob.
$ kubectl get cronjob -n demo
NAME                                 SCHEDULE      SUSPEND   ACTIVE   LAST SCHEDULE   AGE
stash-backup-sample-mariadb-backup   */5 * * * *   True      0        2m59s           20m
Simulate Disaster:
Now, let’s simulate an accidental deletion scenario. Here, we are going to exec into the database pod and delete the company database we had created earlier.
$ kubectl exec -it -n demo sample-mariadb-0 -c mariadb -- bash
root@sample-mariadb-0:/ mysql -u${MYSQL_ROOT_USERNAME} -p${MYSQL_ROOT_PASSWORD}
Welcome to the MariaDB monitor.  Commands end with ; or \g.
Your MariaDB connection id is 341
Server version: 10.5.8-MariaDB-1:10.5.8+maria~focal mariadb.org binary distribution

Copyright (c) 2000, 2018, Oracle, MariaDB Corporation Ab and others.

Type 'help;' or '\h' for help. Type '\c' to clear the current input statement.

# View current databases
MariaDB [(none)]> show databases;
+--------------------+
| Database           |
+--------------------+
| company            |
| information_schema |
| mysql              |
| performance_schema |
+--------------------+
4 rows in set (0.001 sec)

# Let's delete the "company" database
MariaDB [(none)]> drop database company;
Query OK, 1 row affected (0.268 sec)

# Verify that the "company" database has been deleted
MariaDB [(none)]> show databases;
+--------------------+
| Database           |
+--------------------+
| information_schema |
| mysql              |
| performance_schema |
+--------------------+
3 rows in set (0.000 sec)

MariaDB [(none)]> exit
Bye
Create RestoreSession:
To restore the database, you have to create a RestoreSession object pointing to the AppBinding of the targeted database.
Here, is the YAML of the RestoreSession object that we are going to use for restoring our sample-mariadb database.
apiVersion: stash.appscode.com/v1beta1
kind: RestoreSession
metadata:
  name: sample-mariadb-restore
  namespace: demo
spec:
  runtimeSettings:
    pod:
      podAnnotations:
        iam.amazonaws.com/role: "arn:aws:iam::452618475015:role/bucket-accessor"
  repository:
    name: s3-repo
  target:
    ref:
      apiVersion: appcatalog.appscode.com/v1alpha1
      kind: AppBinding
      name: sample-mariadb
  rules:
  - snapshots: [latest]
Notice the
spec.runtimeSettings.podsection. We are now passing the respective IAM annotation viapodAnnotationsfield. Stash will pass this annotation to the respective backup pod.
Here,
spec.runtimeSettins.pod.podAnnotationsrefers to the annotations that will be attached with the respective pod.spec.repository.namespecifies the Repository object that holds the backend information where our backed up data has been stored.spec.target.refrefers to the respective AppBinding of thesample-mariadbdatabase.spec.rulesspecifies that we are restoring data from the latest backup snapshot of the database.
Let’s create the RestoreSession object object we have shown above,
$ kubectl apply -f https://github.com/stashed/docs/raw/v2022.09.29/docs/guides/platforms/eks-kube2iam/examples/restoresession.yaml
restoresession.stash.appscode.com/sample-mariadb-restore created
Once, you have created the RestoreSession object, Stash will create a restore Job. Run the following command to watch the phase of the RestoreSession object,
$ kubectl get restoresession -n demo -w
NAME                     REPOSITORY   PHASE     AGE
sample-mariadb-restore   gcs-repo     Running   15s
sample-mariadb-restore   gcs-repo     Succeeded   18s
The Succeeded phase means that the restore process has been completed successfully.
Verify Restored Data:
Now, let’s exec into the database pod and verify whether data actual data was restored or not,
$ kubectl exec -it -n demo sample-mariadb-0 -c mariadb -- bash
root@sample-mariadb-0:/ mysql -u${MYSQL_ROOT_USERNAME} -p${MYSQL_ROOT_PASSWORD}
Welcome to the MariaDB monitor.  Commands end with ; or \g.
Your MariaDB connection id is 341
Server version: 10.5.8-MariaDB-1:10.5.8+maria~focal mariadb.org binary distribution

Copyright (c) 2000, 2018, Oracle, MariaDB Corporation Ab and others.

Type 'help;' or '\h' for help. Type '\c' to clear the current input statement.

# Verify that the "company" database has been restored
MariaDB [(none)]> show databases;
+--------------------+
| Database           |
+--------------------+
| company            |
| information_schema |
| mysql              |
| performance_schema |
+--------------------+
4 rows in set (0.001 sec)

# Verify that the tables of the "company" database have been restored
MariaDB [(none)]> show tables from company;
+-------------------+
| Tables_in_company |
+-------------------+
| employees         |
+-------------------+
1 row in set (0.000 sec)

# Verify that the sample data of the "employees" table has been restored
MariaDB [(none)]> select * from company.employees;
+---------------+--------+
| name          | salary |
+---------------+--------+
| John Doe      |   5000 |
| James William |   7000 |
+---------------+--------+
2 rows in set (0.000 sec)

MariaDB [(none)]> exit
Bye
Hence, we can see from the above output that the deleted data has been restored successfully from the backup.
Resume Backup
Since our data has been restored successfully we can now resume our usual backup process. Resume the BackupConfiguration using following command,
$ kubectl patch backupconfiguration -n demo sample-mariadb-backup --type="merge" --patch='{"spec": {"paused": false}}'
backupconfiguration.stash.appscode.com/sample-mariadb-backup patched
Or you can use the Stash kubectl plugin to resume the BackupConfiguration,
$ kubectl stash resume -n demo --backupconfig=sample-mariadb-backup
BackupConfiguration demo/sample-mariadb-backup has been resumed successfully.
Verify that the BackupConfiguration has been resumed,
$ kubectl get backupconfiguration -n demo sample-mariadb-backup
NAME                    TASK                    SCHEDULE      PAUSED   PHASE   AGE
sample-mariadb-backup   mariadb-backup-10.5.8   */5 * * * *   false    Ready   29m
Here, false in the PAUSED column means the backup has been resume successfully. The CronJob also should be resumed now.
$ kubectl get cronjob -n demo
NAME                                 SCHEDULE      SUSPEND   ACTIVE   LAST SCHEDULE   AGE
stash-backup-sample-mariadb-backup   */5 * * * *   False     0        2m59s           29m
Here, False in the SUSPEND column means the CronJob is no longer suspended and will trigger in the next schedule.
Allow Operator to List Snapshots
When you list Snapshots using kubectl get snapshot command, Stash operator itself read the Snapshots directly from the backend. So, the operator needs permission to access the bucket. Therefore, stash operator pod should be annotated with the IAM Role. Run the following command to annotate the Stash operator pod using Helm,
 helm upgrade stash appscode/stash \
      --version v2022.06.27 \
      --namespace stash --create-namespace \
      --set features.enterprise=true \
      --set-file global.license=/home/sayem/Downloads/stash.txt  \
      --set  stash-enterprise.podAnnotations.'iam\.amazonaws\.com/role'=arn:aws:iam::452618475015:role/bucket-accessor
Cleanup
To cleanup the Kubernetes resources created by this tutorial, run:
kubectl delete -n demo backupconfiguration sample-mariadb-backup
kubectl delete -n demo restoresession sample-mariadb-restore
kubectl delete -n demo secret encryption-secret
kubectl delete -n demo repository gcs-repo
kubectl delete -n demo mariadb sample-mariadb
kubectl delete ns demo