


You are looking at the documentation of a prior release. To read the documentation of the latest release, please
visit here.
Snapshotting the volumes of a Deployment
This guide will show you how to use Stash to snapshot the volumes of a Deployment and restore them from snapshot using Kubernetes VolumeSnapshot API. In this guide, we are going to backup the volumes in Google Cloud Platform with the help of GCE Persistent Disk CSI Driver.
Before You Begin
- At first, you need to be familiar with the GCE Persistent Disk CSI Driver.
- You need to enable the Kubernetes
VolumeSnapshotDataSourcealpha feature via Kubernetes feature gates--feature-gates=VolumeSnapshotDataSource=true
- Install
Stashin your cluster following the steps here. - If you don’t know how VolumeSnapshot works in Stash, please visit here.
Prepare for VolumeSnapshot
If you don’t already have a StorageClass that uses the CSI driver that supports VolumeSnapshot feature, create one first. Here, we are going to create StorageClass that uses GCE Persistent Disk CSI Driver.
Sample StorageClass YAML are given below,
apiVersion: storage.k8s.io/v1
kind: StorageClass
metadata:
  name: standard
parameters:
  type: pd-standard
provisioner: pd.csi.storage.gke.io
reclaimPolicy: Delete
volumeBindingMode: Immediate
The volumeBindingMode field controls when volume binding and dynamic provisioning should occur. Kubernetes allows Immediate and WaitForFirstConsumer modes for binding volumes. The Immediate mode indicates that volume binding and dynamic provisioning occurs once the PVC is created and WaitForFirstConsumer mode indicates that volume binding and provisioning does not occur until a pod is created that uses this PVC.
Let’s create the StorageClass we have shown above,
$ kubectl apply -f https://github.com/stashed/docs/raw/v2021.06.23/docs/examples/guides/latest/volumesnapshot/storageclass.yaml
storageclass.storage.k8s.io/standard created
We also need a VolumeSnapshotClass. We are going to use the following VolumeSnapshotClass for this tutorial,
apiVersion: snapshot.storage.k8s.io/v1beta1
kind: VolumeSnapshotClass
metadata:
  name: csi-gce-pd-snapshot-class
driver: pd.csi.storage.gke.io
deletionPolicy: Delete
Here,
metadata.annotationsannotations are used to set default volumeSnapshotClass.snapshotterfield to point to the respective CSI driver that is responsible for taking snapshot. As we are using GCE Persistent Disk CSI Driver, we are going to usepd.csi.storage.gke.ioin this field.
Let’s create the volumeSnapshotClass crd we have shown above,
$ kubectl apply -f https://github.com/stashed/docs/raw/v2021.06.23/docs/examples/guides/latest/volumesnapshot/default-volumesnapshotclass.yaml
volumesnapshotclass.snapshot.storage.k8s.io/default-snapshot-class created
To keep everything isolated, we are going to use a separate namespace called demo throughout this tutorial.
$ kubectl create ns demo
namespace/demo created
Note: YAML files used in this tutorial are stored in /docs/examples/guides/latest/volumesnapshot directory of stashed/docs repository.
Take Volume Snapshot
Here, we are going to deploy a Deployment with two PVCs and generate some sample data on it. Then, we are going to take snapshot of those PVCs using Stash.
Create PersistentVolumeClaim :
At first, let’s create two sample PVCs. We are going to mount these PVCs in our targeted Deployment.
Below is the YAML of the sample PVCs,
kind: PersistentVolumeClaim
apiVersion: v1
metadata:
  name: source-data
  namespace: demo
spec:
  accessModes:
  - ReadWriteOnce
  storageClassName: standard
  resources:
    requests:
      storage: 1Gi
---
kind: PersistentVolumeClaim
apiVersion: v1
metadata:
  name: source-config
  namespace: demo
spec:
  accessModes:
  - ReadWriteOnce
  storageClassName: standard
  resources:
    requests:
      storage: 1Gi
Create the PVCs we have shown above.
$ kubectl apply -f https://github.com/stashed/docs/raw/v2021.06.23/docs/examples/guides/latest/volumesnapshot/deployment/pvcs.yaml
persistentvolumeclaim/source-data created
persistentvolumeclaim/source-config created
Deploy Deployment :
Now, we are going to deploy a Deployment that uses the above PVCs. This Deployment will automatically create data.txt and config.cfg file in /source/data and /source/config directory respectively where we have mounted the desired PVCs.
Below is the YAML of the Deployment that we are going to create,
apiVersion: apps/v1
kind: Deployment
metadata:
  labels:
    app: stash-demo
  name: stash-demo
  namespace: demo
spec:
  replicas: 1
  selector:
    matchLabels:
      app: stash-demo
  template:
    metadata:
      labels:
        app: stash-demo
      name: busybox
    spec:
      containers:
      - args: ["echo sample_data > /source/data/data.txt; echo sample_config > /source/config/config.cfg  && sleep 3000"]
        command: ["/bin/sh", "-c"]
        image: busybox
        imagePullPolicy: IfNotPresent
        name: busybox
        volumeMounts:
        - mountPath: /source/data
          name: source-data
        - mountPath: /source/config
          name: source-config
      restartPolicy: Always
      volumes:
      - name: source-data
        persistentVolumeClaim:
         claimName: source-data
      - name: source-config
        persistentVolumeClaim:
          claimName: source-config
Let’s create the deployment we have shown above.
$ kubectl apply -f https://github.com/stashed/docs/raw/v2021.06.23/docs/examples/guides/latest/volumesnapshot/deployment/deployment.yaml
deployment.apps/stash-demo created
Now, wait for the pod of the Deployment to go into the Running state.
$ kubectl get pod -n demo
NAME                          READY   STATUS    RESTARTS   AGE
stash-demo-7fd48dd5b4-xqv5n   1/1     Running   0          2m10s
Verify that the sample data has been created in /source/data and /source/config directory using the following command,
$ kubectl exec -n demo stash-demo-7fd48dd5b4-xqv5n -- cat /source/data/data.txt
sample_data
$ kubectl exec -n demo stash-demo-7fd48dd5b4-xqv5n -- cat /source/config/config.cfg
config_data
Create BackupConfiguration :
Now, create a BackupConfiguration crd to take snapshot of the PVCs of stash-demo Deployment.
Below is the YAML of the BackupConfiguration crd that we are going to create,
apiVersion: stash.appscode.com/v1beta1
kind: BackupConfiguration
metadata:
  name: deployments-volume-snapshot
  namespace: demo
spec:
  schedule: "*/5 * * * *"
  driver: VolumeSnapshotter
  target:
    ref:
      apiVersion: apps/v1
      kind: Deployment
      name: stash-demo
    snapshotClassName: default-snapshot-class
  retentionPolicy:
    name: 'keep-last-5'
    keepLast: 5
    prune: true
Here,
spec.scheduleis a cron expression that indicatesBackupSessionwill be created at 5 minute interval.spec.driverindicates the name of the agent to use to back up the target. Currently, Stash supportsRestic,VolumeSnapshotterdrivers. TheVolumeSnapshotteris used to backup/restore PVC usingVolumeSnapshotAPI.spec.target.refrefers to the backup target.apiVersion,kindandnamerefers to theapiVersion,kindandnameof the targeted workload respectively. Stash will use this information to create a Volume Snapshotter Job for creating VolumeSnapshot.spec.target.snapshotClassNameindicates the VolumeSnapshotClass to be used for volume snapshotting.
Let’s create the BackupConfiguration crd we have shown above.
$ kubectl apply -f https://github.com/stashed/docs/raw/v2021.06.23/docs/examples/guides/latest/volumesnapshot/deployment/backupconfiguration.yaml
backupconfiguration.stash.appscode.com/deployments-volume-snapshot created
Verify CronJob :
If everything goes well, Stash will create a CronJob to take periodic snapshot of source-data and source-config volumes of the deployment with the schedule specified in spec.schedule field of BackupConfiguration crd.
Check that the CronJob has been created using the following command,
$ kubectl get cronjob -n demo
NAME                          SCHEDULE      SUSPEND   ACTIVE   LAST SCHEDULE   AGE
deployments-volume-snapshot   */1 * * * *   False     0        39s             2m41s
Wait for BackupSession :
The deployments-volume-snapshot CronJob will trigger a backup on each schedule by creating a BackupSession crd.
Wait for the next schedule for backup. Run the following command to watch BackupSession crd,
$ watch -n 1 kubectl get backupsession -n demo
Every 1.0s: kubectl get backupsession -n demo                      suaas-appscode: Tue Jun 18 18:35:41 2019

NAME                                     INVOKER-TYPE          INVOKER-NAME                  PHASE       AGE
deployments-volume-snapshot-1563171247   BackupConfiguration   deployments-volume-snapshot   Succeeded   50s
We can see above that the backup session has succeeded. Now, we are going to verify that the VolumeSnapshot has been created and the snapshots has been stored in the respective backend.
Verify Volume Snapshot :
Once a BackupSession crd is created, it creates volume snapshotter Job. Then the Job creates VolumeSnapshot crd for the targeted PVCs.The VolumeSnapshot name follows the following pattern:
<PVC name>-<backup session creation timestamp in Unix epoch seconds>
Check that the VolumeSnapshot has been created Successfully.
$ kubectl get volumesnapshot -n demo
NAME                       AGE
source-config-1563171247   1m46s
source-data-1563171247     1m46s
Let’s find out the actual snapshot name that will be saved in the Google Cloud by the following command,
kubectl get volumesnapshot source-data-1563171247 -n demo -o yaml
apiVersion: snapshot.storage.k8s.io/v1
kind: VolumeSnapshot
metadata:
  creationTimestamp: "2019-07-15T06:14:09Z"
  finalizers:
    - snapshot.storage.kubernetes.io/volumesnapshot-protection
  generation: 4
  name: source-data-1563171247
  namespace: demo
  resourceVersion: "9220"
  selfLink: /apis/snapshot.storage.k8s.io/v1/namespaces/demo/volumesnapshots/source-data-1563171247
  uid: c1bc3390-a6c7-11e9-9f3a-42010a800050
spec:
  source:
    persistentVolumeClaimName: source-data
  volumeSnapshotClassName: default-snapshot-class
status:
  boundVolumeSnapshotContentName: snapcontent-c1bc3390-a6c7-11e9-9f3a-42010a800050
  creationTime: "2019-07-15T06:14:10Z"
  readyToUse: true
  restoreSize: 1Gi
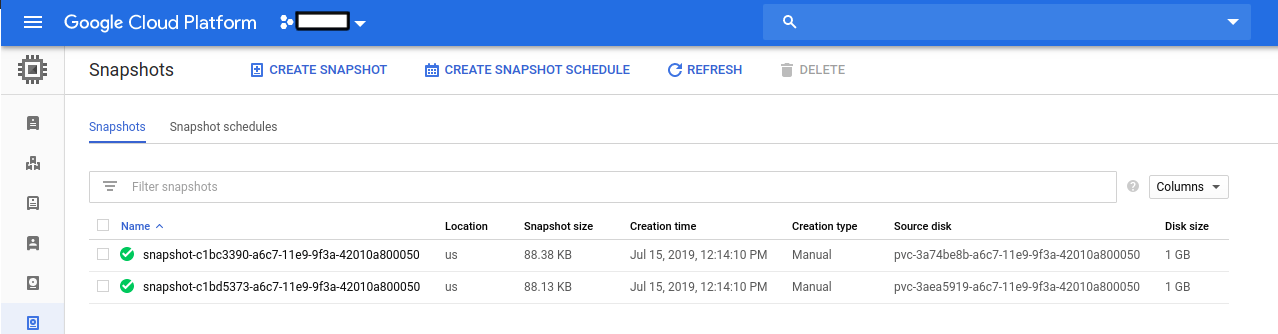
Here, spec.snapshotContentName field specifies the name of the VolumeSnapshotContent crd. It also represents the actual snapshot name that has been saved in Google Cloud. If we navigate to the Snapshots tab in the GCP console, we are going to see the snapshot snapcontent-c1bc3390-a6c7-11e9-9f3a-42010a800050 has been stored successfully.
Restore PVC from VolumeSnapshot
This section will show you how to restore the PVCs from the snapshots we have taken in the previous section.
Stop Taking Backup of the Old Deployment:
At first, let’s stop taking any further backup of the old Deployment so that no backup is taken during the restore process. We are going to pause the BackupConfiguration that we created to backup the stash-demo Deployment. Then, Stash will stop taking any further backup for this Deployment. You can learn more how to pause a scheduled backup here
Let’s pause the deployments-volume-snapshot BackupConfiguration,
$ kubectl patch backupconfiguration -n demo deployments-volume-snapshot --type="merge" --patch='{"spec": {"paused": true}}'
backupconfiguration.stash.appscode.com/deployments-volume-snapshot patched
Now, wait for a moment. Stash will pause the BackupConfiguration. Verify that the BackupConfiguration has been paused,
$ kubectl get backupconfiguration -n demo
NAME                          TASK   SCHEDULE      PAUSED   AGE
deployments-volume-snapshot          */1 * * * *   true     18m
Notice the PAUSED column. Value true for this field means that the BackupConfiguration has been paused.
Create RestoreSession :
At first, we have to create a RestoreSession crd to restore the PVCs from the respective snapshot.
Below is the YAML of the RestoreSesion crd that we are going to create,
apiVersion: stash.appscode.com/v1beta1
kind: RestoreSession
metadata:
  name: restore-pvc
  namespace: demo
spec:
  driver: VolumeSnapshotter
  target:
    volumeClaimTemplates:
      - metadata:
          name: restore-data
        spec:
          accessModes: [ "ReadWriteOnce" ]
          storageClassName: "standard"
          resources:
            requests:
              storage: 1Gi
          dataSource:
            kind: VolumeSnapshot
            name: source-data-1563171247
            apiGroup: snapshot.storage.k8s.io
      - metadata:
          name: restore-config
        spec:
          accessModes: [ "ReadWriteOnce" ]
          storageClassName: "standard"
          resources:
            requests:
              storage: 1Gi
          dataSource:
            kind: VolumeSnapshot
            name: source-config-1563171247
            apiGroup: snapshot.storage.k8s.io
Here,
spec.target.volumeClaimTemplates:metadata.nameis a template for the name of the restored PVC that will be created by Stash. You have to provide this named template to match with the desired PVC of your Deployment.spec.dataSource:spec.dataSourcespecifies the source of the data from where the newly created PVC will be initialized. It requires the following fields to be set:apiGroupis the group for resource being referenced. Now, Kubernetes supports onlysnapshot.storage.k8s.io.kindis resource of the kind being referenced. Now, Kubernetes supports onlyVolumeSnapshot.nameis theVolumeSnapshotresource name. InRestoreSessioncrd, You must set the VolumeSnapshot name directly.
Let’s create the RestoreSession crd we have shown above.
$ kubectl create -f ./docs/examples/guides/latest/volumesnapshot/deployment/restoresession.yaml
restoresession.stash.appscode.com/restore-pvc created
Once, you have created the RestoreSession crd, Stash will create a job to restore. We can watch the RestoreSession phase to check if the restore process has succeeded or not.
Run the following command to watch RestoreSession phase,
$ watch -n 1 kubectl get restore -n demo
Every 1.0s: kubectl get restore -n demo                      suaas-appscode: Tue Jun 18 18:35:41 2019

NAME          REPOSITORY-NAME   PHASE       AGE
restore-pvc                     Running     10s
restore-pvc                     Succeeded   1m
So, we can see from the output of the above command that the restore process succeeded.
Verify Restored PVC :
Once the restore process is complete, we are going to see that new PVCs with the name source-data and source-config have been created.
Verify that the PVCs have been created by the following command,
$ kubectl get pvc -n demo
NAME             STATUS   VOLUME                                     CAPACITY   ACCESS MODES   STORAGECLASS   AGE
restore-config   Bound    pvc-26758eda-a6ca-11e9-9f3a-42010a800050   1Gi        RWO            standard       30s
restore-data     Bound    pvc-267335ff-a6ca-11e9-9f3a-42010a800050   1Gi        RWO            standard       30s
Notice the STATUS field. It indicates that the respective PV has been provisioned and initialized from the respective VolumeSnapshot by CSI driver and the PVC has been bound with the PV.
The volumeBindingMode field controls when volume binding and dynamic provisioning should occur. Kubernetes allows
ImmediateandWaitForFirstConsumermodes for binding volumes. TheImmediatemode indicates that volume binding and dynamic provisioning occurs once the PVC is created andWaitForFirstConsumermode indicates that volume binding and provisioning does not occur until a pod is created that uses this PVC. By defaultvolumeBindingModeisImmediate.
If you use
volumeBindingMode: WaitForFirstConsumer, respective PVC will be initialized from respective VolumeSnapshot after you create a workload with that PVC. In this case, Stash will mark the restore session as completed with phaseUnknown.
Verify Restored Data :
We are going to create a new Deployment with the restored PVCs to verify whether the backed up data has been restored.
Below is the YAML of the Deployment that we are going to create,
apiVersion: apps/v1
kind: Deployment
metadata:
  labels:
    app: restore-demo
  name: restore-demo
  namespace: demo
spec:
  replicas: 1
  selector:
    matchLabels:
      app: restore-demo
  template:
    metadata:
      labels:
        app: restore-demo
      name: busybox
    spec:
      containers:
      - args:
        - sleep
        - "3600"
        image: busybox
        imagePullPolicy: IfNotPresent
        name: busybox
        volumeMounts:
        - mountPath: /restore/data
          name: restore-data
        - mountPath: /restore/config
          name: restore-config
      restartPolicy: Always
      volumes:
      - name: restore-data
        persistentVolumeClaim:
          claimName: restore-data
      - name: restore-config
        persistentVolumeClaim:
          claimName: restore-config
Let’s create the deployment we have shown above.
$ kubectl apply -f https://github.com/stashed/docs/raw/v2021.06.23/docs/examples/guides/latest/volumesnapshot/deployment/restored-deployment.yaml
deployment.apps/restore-demo created
Now, wait for the pod of the Deployment to go into the Running state.
$ kubectl get pod -n demo
NAME                            READY   STATUS    RESTARTS   AGE
restore-demo-544db78b8b-tnzb2   1/1     Running   0          34s
Verify that the backed up data has been restored in /restore/data and /restore/config directory using the following command,
$ kubectl exec -n demo restore-demo-544db78b8b-tnzb2 ls /restore/config/config.cfg
config_data
$ kubectl exec -n demo restore-demo-544db78b8b-tnzb2 ls /restore/data/data.txt
sample_data
Cleaning Up
To clean up the Kubernetes resources created by this tutorial, run:
kubectl delete -n demo deployment stash-demo
kubectl delete -n demo deployment restore-demo
kubectl delete -n demo backupconfiguration deployments-volume-snapshot
kubectl delete -n demo restoresession restore-pvc
kubectl delete -n demo storageclass standard
kubectl delete -n demo volumesnapshotclass default-snapshot-class